Participating in the Altenew Educator Certification Program has been so much fun! My husband bought me the Level 1 and Level 2 classes last December as a Christmas gift, and what a wonderful gift they have been! I recently completed all 10 classes in Level 1 and am looking forward to the 10 classes in Level 2! However, before I start those classes, there's a Level 1 Final Project, and this post is Part 1 of my Level 1 Final Project. The instructions for the final project were to create a cohesive set of 4-6 feminine cards and packaging as well as a set of 4-6 masculine cards and packaging. In the sets and packaging, I needed to apply at least 3 techniques from the classes in Level 1. I also needed to incorporate recycled packaging in my cards and/or packaging for the cards. This post covers the set of feminine fun fold cards I created.
.jpg)

Techniques used:
Ink Blending Techniques: Lesson 2: Ink blend cardstock to make a matching background color (inside panel of Card #2, back panel of Card #4, and inside panel of Card #5)
Let It Shine: Lesson 1: Glitter Cardstock (I used glitter cardstock in cards 1, 3, and 4)
Lesson 3: Embellishments (I used Gem Sparkles and Enamel Dots on all 5 cards)
Clean & Simple Boutique Cards: Lesson 6: Creating Packaging for Cards: I created a box for my set of feminine cards
To make the set cohesive, I chose to include the following elements in all my feminine cards:
Color palette: Yellow, Pink, and Green (I used Altenew's Fresh Lemon Crisp Dye Ink, Magenta Fresh Dye Ink, and Frayed Leaf Fresh Dye Ink for all my ink blending)
Sentiment: Congrats/congratulations (always stamped or die cut in black on yellow cardstock)
Flower: magnolia
Card Style: Fun fold and shaker cards
Every card in the set features Altenew's Magnolia Dreams embossing folder and coordinating stencil along with at least one die cut magnolia flower. In my description of products used, I haven't mentioned the inks or Magnolia Dreams set because I used them in all 5 cards.
Recycled packaging: I upcycled a pretty box to put my cards in.
Card #1: Winged Diamond Pop-Up Card (inspired by Iced Images)


Back of the card:


Measurements:
Yellow cardstock:
- One sheet of yellow cardstock trimmed to 7" x 9" and scored at: 2 1/2", 3 1/2", 5 1/2", 6 1/2" along the long edge
- (3) 2 1/2" x 2 1/2" squares
- (1) 2 3/4" x 2 3/4" square cut on the diagonal to create 2 triangles
- (2) 1 1/2" x 2" rectangles scored at: 1/2", 1, 1 1/2" on long edge
- (1) 1 1/2" x 1 1/2" square for the "congrats" sentiment with the Pink Tourmaline Gem Sparkles
- (4) 2 1/4" x 6 3/4" panels
- (1) 1 3/4" x 6 3/4" panels
- (3)
2 1/4" x 2 1/4" squares
- (1) 2 1/2" x 2 1/2" square cut on the diagonal to create (2) triangles
- (3) 2" x 6 1/2" panels embossed with Craft-Your-Life: Elegant Motifs 3D embossing folder (2 for the front and one for the back of the card)
- (1) 1 1/2" x 6 1/2" panel embossed with the Elegant Motifs embossing folder (for the center panel in the front)
- (3) 2" x 2" squares embossed with Magnolia Dreams 3D embossing folder and ink blended with the coordinating stencils
- (1) 2 1/4" x 2 1/4" square embossed with Magnolia Dreams and ink blended with the coordinating stencils and then cut on the diagonal to create (2) triangles
- (1) 2" x 6 1/2"
Instructions:
After cutting all the pieces according to the measurements above, I did my embossing and stamping and then adhered my layers together. I added the pop-up boxes to the sides of the center panel. Then I added all the pieces for the front of the card to the card base.
For the back of the card, I stamped "Best wishes on your journey ahead" from Craft-Your-Life: Graceful Gardenia and added a magnolia die cut from the Parchment Bouquet set and 3 gems from the Pink Tourmaline Gem Sparkle set. I added that panel to the right side of the card after layering it on green cardstock and then I embossed a matching white panel using the same Elegant Motifs embossing folder and layered that on a matching green panel and adhered the panel to the left side on the back of the card base.


After adding the center diamond to the front and stamping and embellishing the back, I also fussy cut an embossed and stenciled magnolia for the envelope. I adhered it to the bottom left of the envelope to decorate it.
Additional Altenew products used:
Bouquet of Poppies (for the "congrats" sentiment), Pink Tourmaline Gem Sparkles, Glowing Green Glitter Cardstock from the Fairy Dust Glitter Cardstock collection, Craft-Your-Life: Elegant Motifs embossing folder, Craft-Your-Life: Graceful Gardenia "Best wishes on your journey ahead" sentiment, and the Parchment Bouquet Die Set for the magnolia on the back of the card
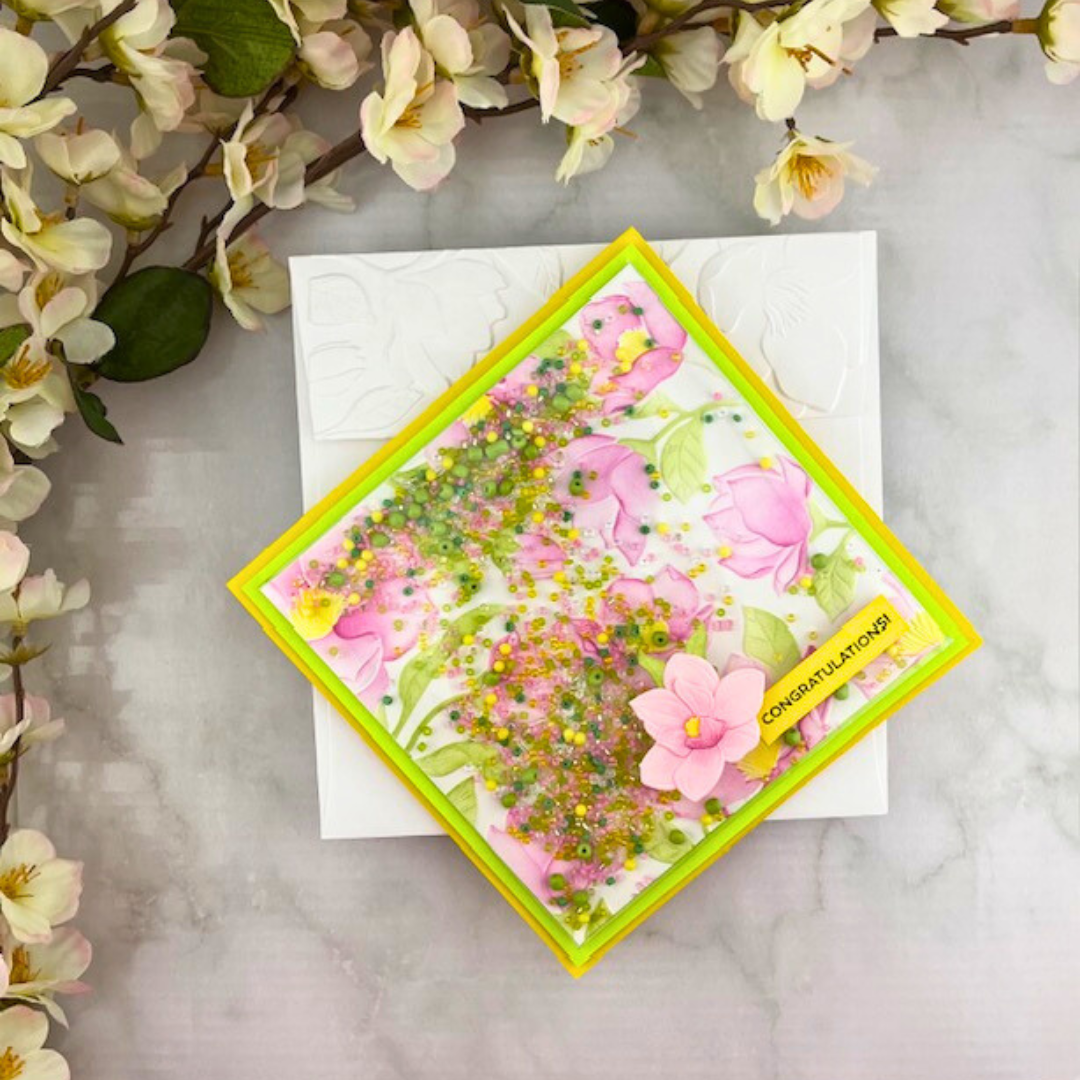
Card #2: Square Shaker Card


Measurements:
Yellow card base:
- 5 1/2" by 11" scored at 5 1/2" to create the 5 1/2" square card base
Green Cardstock:
- 5 1/4" by 5 1/4"
White Cardstock:
- 5" by 5"
Instructions:
I embossed and stenciled my white cardstock panel using the Magnolia Dreams set and then added it to a shaker pouch and adhered 3 sides of the shaker pouch to the back of the panel. I then added in beads of various sizes to match my color palette before sealing the pouch. I added the pouch to the green cardstock layer using red tape. Then I added a layer of green fun foam I trimmed to just over 5" by 5" to the yellow card base and adhered the front panel to the fun foam.
For the die cut flowers by the sentiments on both the outside and the inside of the card, I did some ink blending using the Magenta Fresh Dye Ink on pink cardstock and Fresh Leaf on white cardstock. Then I stamped "Congratulations" and "Happy Graduation!" on yellow and green cardstock respectively and trimmed the sentiments before adhering them to the outside and inside of the card. I added the die cut magnolia flowers and then finished the card by adding enamel dots to the inside of the card.
To create a coordinating envelope, I embossed the flap of a 6" by 6" envelope using the Magnolia Dreams embossing folder.
Additional Altenew products used: Craft-Your-Life: Flourishing Garden for the "Congratulations!" and "Happy Graduation!" sentiments, Parchment Bouquet die set for the magnolia flowers and leaves, and Zesty Lemon Lime Enamel Dots for the inside of the card.
Card #3: 3-Panel Accordion Card (inspired by Connie Stewart)


Yellow cardstock:
- 5 1/2" by 12" scored at 1 3/4", 4 3/4," and 7 3/4"
Green Cardstock:
- (2) 1 1/2" by 5 1/4"
- (2) 2 3/4" by 5 1/4"
- (1) 4" by 5 1/4"
White Cardstock:
- (2) 1 1/4" by 5"
- (2) 2 1/2" by 5"
- (1) 3 3/4" by 5"
Instructions:
I trimmed all the pieces to the measurements above and then embossed and ink blended the smaller white panels using the Magnolia Dreams set. I embossed the last white panel (3 3/4" by 5") with the Lace embossing folder and left it white.
I adhered all the layers to the yellow card base and then added the largest flower from the Craft-A-Flower: Southern Magnolia to the inside of the card after debating about which flowers to add where. I die cut the Sparkled Frame out of yellow cardstock and stamped the oval from the center of the die cut with the "congratulations" sentiment. I played around with ideas for where to place which flowers on the oval until I decided to add the smaller flower from the CAF: Southern Magnolia set and then one of the magnolias from the Parchment Bouquet set. I used a bit of glitter cardstock for accents on all my die cut magnolias. I stamped the "you're strong, beautiful, capable, & simply awesome" sentiment onto the panel and then finished the card by adding some Pink Tourmaline Gem Sparkles to the outside oval and the final inside panel of the card.
To create a coordinating envelope, I embossed the envelope flap with the Magnolia Dreams embossing folder.


Additional Altenew products used:
Twinkling Pink from the Fairy Dust Glitter Cardstock Collection, Craft-A-Flower: Southern Magnolia, Parchment Bouquet die set (for the smaller magnolias and leaves), Gift From Heaven stamp set for the "congratulations" sentiment, Pink Tourmaline Gem Sparkles, Craft-Your-Life: Vintage Tapestry for the "you're strong, beautiful, capable, & simply awesome" sentiment, Lace 3D embossing folder, and Sparkled Frame die for the yellow die cut oval (it's the center die cut when the frame is cut)
Card #4: Pop-Up Pillar Card (Inspired by Lynn Dunn)


Measurements:
Yellow cardstock:
- 5 1/2" by 8 1/4" scored at 1/2", 2", 2 1/2", and 4
Green cardstock:
- (2) 1 1/4" by 51/4"
- (1) 1/4" by 5 1/4"
- (1) 3 3/4" by 5 1/4"
- (1) 4' by 5 1/4"
White cardstock:
- (2) 1" by 5"
- (1) 3 1/2" by 5"
Pink cardstock:
- 3 1/2" by 5"
Instructions:
First, I trimmed all my pieces to the measurements listed above. Then I used the Magnolia Dreams set to emboss and ink blend on all the white panels. I ink blended some Magenta ink onto the pink panel. Then I adhered all the panels to the card base and created the pop-up panel by adhering the last 1/2" of the yellow card base to the card base to form a little box that pops up.
For the Parchment Bouquet, I added some ink blending to the magnolia flowers and used some glitter cardstock for the foliage pieces. I added my "congrats" sentiment that I had die cut out of both yellow cardstock and yellow fun foam for dimension.
For the back of the card, I added my ink-blended panel and then popped up my stamped "Happy Anniversary" sentiment using Instant Dimension Foam Tape. I finished off the back using a few enamel dots and a trimmed glitter cardstock die cut from the Parchment Bouquet set.
To make the coordinating envelope, I again embossed the envelope flap with the Magnolia Dreams embossing folder.


Additional Altenew products used:
Parchment Bouquet die set, Glowing Green and Twinkling Pink Glitter Cardstock from the Fairy Dust Glitter Cardstock Collection, Craft-Your-Life: Splendid Bouquet for the "congrats" sentiment and coordinating die, Craft-Your-Life: Flourishing Garden for the "Happy Anniversary!" sentiment, and Whispering Woodland Enamel Dots
Card #5: Book-Binding Gatefold Card


Measurements:
Yellow cardstock:
- 4 1/4" by 11" scored at 2 1/8", 3 3/8", and 8 7/8"
Green cardstock:
- (1) 1" by 4"
- (2) 1 7/8" by 4"
- (1) 4" by 4"
White cardstock:
- (1) 3/4" by 3 3/4"
- (2) 1 5/8" by 3 3/4"
Pink cardstock:
- (1) 3 3/4" by 3 3/4"
Instructions:
I trimmed all the pieces and then embossed and ink blended the white pieces with the Magnolia Dreams set. I ink blended the pink square with Magenta ink. Then I adhered all the pieces to the card base and die cut the "congrats" and shadow dies. I die cut a second shadow die from fun foam to give the sentiment some dimension. I added a Velcro dot behind the "c" of "congrats to hold the card closed (see photo below).

Additional Altenew products used:
Bubblegum Dreams Enamel Dots, Versatile Greetings 2 die set for the "congrats" sentiment and shadow, Craft-Your-Life: Splendid Bouquet for the "With cheers..." sentiment, and the Parchment Bouquet die set for the magnolia die cut inside the card
Gift Box:
I started with a pretty box from a paper flower bouquet my sister sent me:


For the inside of the box, I decided to use my pretty Altenew bubble mailers to decorate the plain white interior:


Here's a look at the cards once they were wrapped in recycled tissue paper and placed in the box:

This concludes my longest blog post to date! Thanks for looking at Part 1 of my Level 1 Final Project! Here's a peek at my masculine set, too:

.jpg)
.jpg)
Carrie-your creativity here is amazing! The cards are stunning and there are so many awesome-inspiring techniques you demonstrated through your final project! I am impressed at how you were also able to up-cycle the display box! I never would have thought about doing that but it came out so lovely. Congratulations on your Level 1 courses and best wishes as you pursue Level 2 with Altenew!!
ReplyDeleteThank you so much, Kath! And congratulations on your Anna Griffin win yesterday!
DeleteAmazing details in your blog. I had no idea that so much effort goes into each beautiful card. Anyone will be blessed to have a card made by Carrie!
ReplyDeleteThank you!
DeleteCarrie these are fantastic. I loved that you put all the directions for them. Awesome job. Can’t wait to see part 2
ReplyDelete
DeleteCarrie I sent the messsage above sorry I didnt sign in right May 8th 1:33pm
Thank you so much, Carol! I appreciate you taking the time to visit my blog and leave such a kind comment!
DeleteYour feminine set is like a breath of spring—light, bright, and full of joy! The fancy folds add a delightful surprise to every card, and the soft florals are just dreamy. This whole collection radiates happiness and creativity.
ReplyDeleteYou absolutely nailed both themes! Your attention to detail, color choices, and fold styles are just phenomenal—so well thought out and beautifully executed!
Thank you so much, Erum! I appreciate all your encouragement! This was a fun project!
DeleteWow!🤩 I took photos of all cards and instructions! When I finish my retreat projects. These will be fun to recreate these
ReplyDeleteI think this is Kimberly from the Altenew Fan Group. If so, I hope you share any fun fold cards you make from these measurements in the Fan Group!
Delete