Wednesday, May 7, 2025

AECP Level 1 Final Project Part 1

Participating in the Altenew Educator Certification Program has been so much fun! My husband bought me the Level 1 and Level 2 classes last December as a Christmas gift, and what a wonderful gift they have been! I recently completed all 10 classes in Level 1 and am looking forward to the 10 classes in Level 2! However, before I start those classes, there's a Level 1 Final Project, and this post is Part 1 of my Level 1 Final Project. The instructions for the final project were to create a cohesive set of 4-6 feminine cards and packaging as well as a set of 4-6 masculine cards and packaging. In the sets and packaging, I needed to apply at least 3 techniques from the classes in Level 1. I also needed to incorporate recycled packaging in my cards and/or packaging for the cards. This post covers the set of feminine fun fold cards I created. 


Techniques used: 

Ink Blending Techniques: Lesson 2: Ink blend cardstock to make a matching background color (inside panel of Card #2, back panel of Card #4, and inside panel of Card #5)

Let It Shine: Lesson 1: Glitter Cardstock (I used glitter cardstock in cards 1, 3, and 4)

                    Lesson 3: Embellishments (I used Gem Sparkles and Enamel Dots on all 5 cards)

Clean & Simple Boutique Cards: Lesson 6: Creating Packaging for Cards: I created a box for my set of feminine cards

To make the set cohesive, I chose to include the following elements in all my feminine cards:

Color palette: Yellow, Pink, and Green (I used Altenew's Fresh Lemon Crisp Dye Ink, Magenta Fresh Dye Ink, and Frayed Leaf Fresh Dye Ink for all my ink blending)

Sentiment: Congrats/congratulations (always stamped or die cut in black on yellow cardstock)

Flower: magnolia

Card Style: Fun fold and shaker cards

Every card in the set features Altenew's Magnolia Dreams embossing folder and coordinating stencil along with at least one die cut magnolia flower. In my description of products used, I haven't mentioned the inks or Magnolia Dreams set because I used them in all 5 cards. 

Recycled packaging: I upcycled a pretty box to put my cards in. 

Card #1: Winged Diamond Pop-Up Card (inspired by Iced Images)


Side views:


Back of the card:


Card with coordinating envelope:


Measurements:

Yellow cardstock:

  • One sheet of yellow cardstock trimmed to 7" x 9" and scored at: 2 1/2", 3 1/2", 5 1/2", 6 1/2" along the long edge
  • (3)  2 1/2" x 2 1/2" squares
  • (1) 2 3/4" x 2 3/4" square cut on the diagonal to create 2 triangles
  • (2) 1 1/2" x 2" rectangles scored at: 1/2", 1, 1 1/2" on long edge
  • (1) 1 1/2" x 1 1/2" square for the "congrats" sentiment with the Pink Tourmaline Gem Sparkles 
Green Cardstock:
  • (4) 2 1/4" x 6 3/4" panels 
  • (1) 1 3/4" x 6 3/4" panels 
Glowing Green Glitter Cardstock:
  • (3) 2 1/4" x 2 1/4" squares
  • (1) 2 1/2" x 2 1/2" square cut on the diagonal to create (2) triangles
White cardstock:
  • (3) 2" x 6 1/2" panels embossed with Craft-Your-Life: Elegant Motifs 3D embossing folder (2 for the front and one for the back of the card)
  • (1) 1 1/2" x 6 1/2" panel embossed with the Elegant Motifs embossing folder (for the center panel in the front)
  • (3) 2" x 2" squares embossed with Magnolia Dreams 3D embossing folder and ink blended with the coordinating stencils 
  • (1) 2 1/4" x 2 1/4" square embossed with Magnolia Dreams and ink blended with the coordinating stencils and then cut on the diagonal to create (2) triangles 
  • (1) 2" x 6 1/2" panel stamped with "Best wishes on your journey ahead" sentiment and embellished with Pink Tourmaline Gem Sparkles and magnolia and leaves die cuts

Instructions: 

After cutting all the pieces according to the measurements above, I did my embossing and stamping and then adhered my layers together. I added the pop-up boxes to the sides of the center panel. Then I added all the pieces for the front of the card to the card base.

For the back of the card, I stamped "Best wishes on your journey ahead" from Craft-Your-Life: Graceful Gardenia and added a magnolia die cut from the Parchment Bouquet set and 3 gems from the Pink Tourmaline Gem Sparkle set. I added that panel to the right side of the card after layering it on green cardstock and then I embossed a matching white panel using the same Elegant Motifs embossing folder and layered that on a matching green panel and adhered the panel to the left side on the back of the card base. 


After adding the center diamond to the front and stamping and embellishing the back, I also fussy cut an embossed and stenciled magnolia for the envelope. I adhered it to the bottom left of the envelope to decorate it. 

Additional Altenew products used:

Bouquet of Poppies (for the "congrats" sentiment), Pink Tourmaline Gem Sparkles, Glowing Green Glitter Cardstock from the Fairy Dust Glitter Cardstock collection, Craft-Your-Life: Elegant Motifs embossing folder, Craft-Your-Life: Graceful Gardenia "Best wishes on your journey ahead" sentiment, and the Parchment Bouquet Die Set for the magnolia on the back of the card 


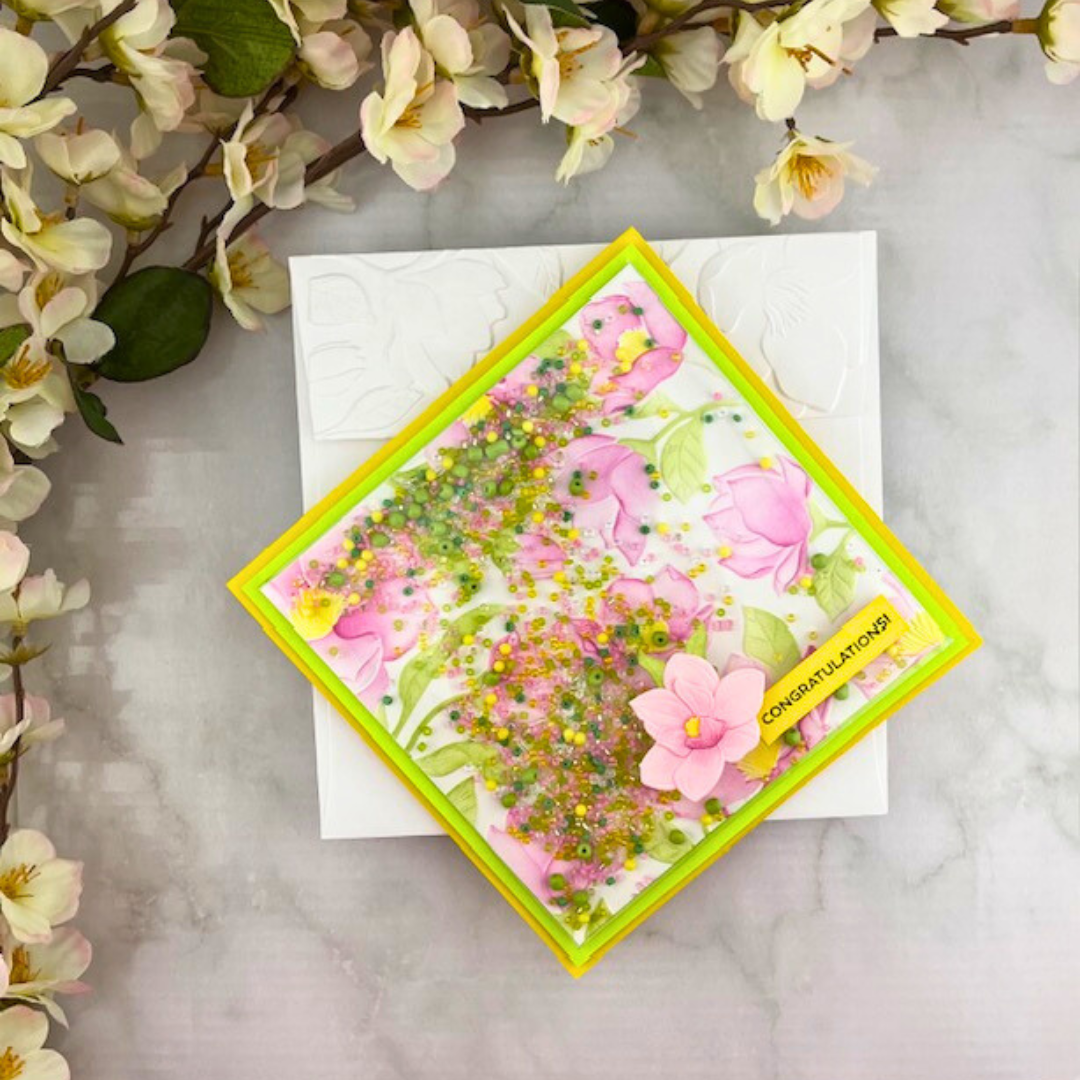
Card #2:  Square Shaker Card


Inside the card:


Card with coordinating envelope:


Measurements:

Yellow card base: 

  • 5 1/2" by 11" scored at 5 1/2" to create the 5 1/2" square card base

Green Cardstock: 

  • 5 1/4" by 5 1/4"

White Cardstock: 

  • 5" by 5"

Instructions: 

I embossed and stenciled my white cardstock panel using the Magnolia Dreams set and then added it to a shaker pouch and adhered 3 sides of the shaker pouch to the back of the panel. I then added in beads of various sizes to match my color palette before sealing the pouch. I added the pouch to the green cardstock layer using red tape. Then I added a layer of green fun foam I trimmed to just over 5" by 5" to the yellow card base and adhered the front panel to the fun foam. 

For the die cut flowers by the sentiments on both the outside and the inside of the card, I did some ink blending using the Magenta Fresh Dye Ink on pink cardstock and Fresh Leaf on white cardstock. Then I stamped "Congratulations" and "Happy Graduation!" on yellow and green cardstock respectively and trimmed the sentiments before adhering them to the outside and inside of the card. I added the die cut magnolia flowers and then finished the card by adding enamel dots to the inside of the card. 

To create a coordinating envelope, I embossed the flap of a 6" by 6" envelope using the Magnolia Dreams embossing folder. 

Additional Altenew products used: Craft-Your-Life: Flourishing Garden for the "Congratulations!" and "Happy Graduation!" sentiments, Parchment Bouquet die set for the magnolia flowers and leaves, and Zesty Lemon Lime Enamel Dots for the inside of the card. 


Card #3: 3-Panel Accordion Card (inspired by Connie Stewart)


Card with coordinating envelope:


Measurements:

Yellow cardstock: 

  • 5 1/2" by 12" scored at 1 3/4", 4 3/4," and 7 3/4"

Green Cardstock: 

  • (2) 1 1/2" by 5 1/4" 
  • (2) 2 3/4" by 5 1/4"
  • (1) 4" by 5 1/4"

White Cardstock: 

  • (2) 1 1/4" by 5" 
  • (2) 2 1/2" by 5"
  • (1) 3 3/4" by 5"

Instructions: 

I trimmed all the pieces to the measurements above and then embossed and ink blended the smaller white panels using the Magnolia Dreams set. I embossed the last white panel (3 3/4" by 5") with the Lace embossing folder and left it white. 

I adhered all the layers to the yellow card base and then added the largest flower from the Craft-A-Flower: Southern Magnolia to the inside of the card after debating about which flowers to add where. I die cut the Sparkled Frame out of yellow cardstock and stamped the oval from the center of the die cut with the "congratulations" sentiment. I played around with ideas for where to place which flowers on the oval until I decided to add the smaller flower from the CAF: Southern Magnolia set and then one of the magnolias from the Parchment Bouquet set. I used a bit of glitter cardstock for accents on all my die cut magnolias. I stamped the "you're strong, beautiful, capable, & simply awesome" sentiment onto the panel and then finished the card by adding some Pink Tourmaline Gem Sparkles to the outside oval and the final inside panel of the card. 

To create a coordinating envelope, I embossed the envelope flap with the Magnolia Dreams embossing folder. 


Additional Altenew products used: 

Twinkling Pink from the Fairy Dust Glitter Cardstock Collection, Craft-A-Flower: Southern Magnolia, Parchment Bouquet die set (for the smaller magnolias and leaves), Gift From Heaven stamp set for the "congratulations" sentiment, Pink Tourmaline Gem Sparkles, Craft-Your-Life: Vintage Tapestry for the "you're strong, beautiful, capable, & simply awesome" sentiment, Lace 3D embossing folder, and Sparkled Frame die for the yellow die cut oval (it's the center die cut when the frame is cut)


Card #4: Pop-Up Pillar Card (Inspired by Lynn Dunn)


Card with coordinating envelope:


Measurements: 

Yellow cardstock: 

  • 5 1/2" by 8 1/4" scored at 1/2", 2", 2 1/2", and 4

Green cardstock: 

  • (2) 1 1/4" by 51/4"
  • (1) 1/4" by 5 1/4"
  • (1) 3 3/4" by 5 1/4"
  • (1) 4' by 5 1/4"

White cardstock: 

  • (2) 1" by 5"
  • (1) 3 1/2" by 5"

Pink cardstock: 

  • 3 1/2" by 5"

Instructions: 

First, I trimmed all my pieces to the measurements listed above. Then I used the Magnolia Dreams set to emboss and ink blend on all the white panels. I ink blended some Magenta ink onto the pink panel. Then I adhered all the panels to the card base and created the pop-up panel by adhering the last 1/2" of the yellow card base to the card base to form a little box that pops up. 

For the Parchment Bouquet, I added some ink blending to the magnolia flowers and used some glitter cardstock for the foliage pieces. I added my "congrats" sentiment that I had die cut out of both yellow cardstock and yellow fun foam for dimension. 

For the back of the card, I added my ink-blended panel and then popped up my stamped "Happy Anniversary" sentiment using Instant Dimension Foam Tape. I finished off the back using a few enamel dots and a trimmed glitter cardstock die cut from the Parchment Bouquet set. 

To make the coordinating envelope, I again embossed the envelope flap with the Magnolia Dreams embossing folder. 


Additional Altenew products used:

Parchment Bouquet die set, Glowing Green and Twinkling Pink Glitter Cardstock from the Fairy Dust Glitter Cardstock Collection, Craft-Your-Life: Splendid Bouquet for the "congrats" sentiment and coordinating die, Craft-Your-Life: Flourishing Garden for the "Happy Anniversary!" sentiment, and Whispering Woodland Enamel Dots


Card #5: Book-Binding Gatefold Card


Card with coordinating envelope:


Measurements:

Yellow cardstock: 

  • 4 1/4" by 11" scored at 2 1/8", 3 3/8", and 8 7/8"

Green cardstock: 

  • (1) 1" by 4"
  • (2) 1 7/8" by 4" 
  • (1) 4" by 4" 

White cardstock: 

  • (1) 3/4" by 3 3/4"  
  • (2) 1 5/8" by 3 3/4"

Pink cardstock: 

  • (1) 3 3/4" by 3 3/4"

Instructions:

I trimmed all the pieces and then embossed and ink blended the white pieces with the Magnolia Dreams set. I ink blended the pink square with Magenta ink. Then I adhered all the pieces to the card base and die cut the "congrats" and shadow dies. I die cut a second shadow die from fun foam to give the sentiment some dimension. I added a Velcro dot behind the "c" of "congrats to hold the card closed (see photo below). 


For the inside of the card, I stamped "With cheers and applause, we celebrate you. Congratulations on all that you do!" and then added 3 enamel dots and an ink-blended magnolia and leaves from the Parchment Bouquet set. 

I once again embossed the flap of an A2 envelope with the Magnolia Dreams embossing folder to create a coordinating envelope for the card. 

Additional Altenew products used: 

Bubblegum Dreams Enamel Dots, Versatile Greetings 2 die set for the "congrats" sentiment and shadow, Craft-Your-Life: Splendid Bouquet for the "With cheers..." sentiment, and the Parchment Bouquet die set for the magnolia die cut inside the card 

Gift Box: 

I started with a pretty box from a paper flower bouquet my sister sent me:


I decorated the top of it by adding a gold oval (the inside die cut from the Sparkled Frame die) and then die cut magnolias from the Craft-A-Flower: Southern Magnolia set and the Parchment Bouquet set using fuchsia glitter fun foam for the largest flower, pink cardstock ink blended with Magenta ink for the second largest flower, and Twinkling Pink from the Fairy Dust Glitter Cardstock set for the smallest flower. I arranged the magnolias on the oval along with some leaves I had ink blended with Frayed Leaf Fresh Dye Ink. I liked the "You deserve the best" sentiment as I thought it went with the congratulations theme of my cards, so I didn't cover it. 


For the inside of the box, I decided to use my pretty Altenew bubble mailers to decorate the plain white interior:


I keep all my Altenew bubble mailers because they are so pretty! For the inside of the box, I trimmed down one bubble mailer for the bottom of the box and then a second one to cover the back and side:


Here's a look at the cards once they were wrapped in recycled tissue paper and placed in the box:


This concludes my longest blog post to date! Thanks for looking at Part 1 of my Level 1 Final Project! Here's a peek at my masculine set, too: 


Continuity between sets: 
While no two cards used the same card style/size, all cards in both sets featured a congratulations theme and a fun fold or shaker card design. 


Hexagon Tower Card for Word Art Wednesday

 I'm grateful to be a Guest Designer over on the Word Art Wednesday blog where a new Scripture Word Art is offered every 2 weeks. The scripture for this challenge is Luke 1:45: "And blessed is she that believed: for there shall be a performance of those things which were told her from the Lord." This is what Elizabeth said about Mary when Mary came to see her while Elizabeth was pregnant with John the Baptist and Mary was pregnant with the Lord Jesus. Indeed all that the Lord promised to Mary did in fact come to pass because the Lord always keeps His promises. I hope that will encourage you in whatever you may be facing today. 


To create my card, I started with a card design by Di's Den for Stamping on YouTube here: #295 (25) 6x6inch Hexagon Tower Card. There's also a pdf tutorial available if you join her Facebook group. 

I created the card base using a bright yellow cardstock and then trimmed my layers out of pink and white cardstock. After I had trimmed all my layers, I ran the white layers through Altenew's 3D embossing folder Garden Harmony and then assembled the layers of the card using Art Glitter liquid glue. 

To decorate the front of the card, I printed the verse onto white cardstock and die cut it using Altenew's Terrific Tags die set. Then I tied a little bow on it using some pink ribbon from my stash. I die cut an oval out of pink cardstock using Altenew's Sparkled die (I saved the frame for later use and just used the oval that is die cut out of the center of the frame). I added some metallic die cuts from Altenew's Zero Waste: Berries and Branches die and then popped up the tag with the verse using Altenew's new 1-inch wide and 1/16-inch thick foam tape. I added 3 enamel dots from Altenew's Colorful World enamel dot set to finish the card. 

I hope you'll play along over on the Word Art Wednesday challenge blog where the theme is always Anything Goes. If you'd like to share your work, here's the link: Word Art Wednesday

I've recently become an affiliate for Altenew, so if you are interested in ordering something lovely from Altenew and would like to use my link, thank you very much! Here's the link: Carrie's Altenew affiliate page 


Challenges I'm entering:

Creative Creases #103: ATG with a fun fold project (DT submission to the linkup)

The Paper Funday Challenges: ATG with option of celebrate something new (1/6; ends at the end of the month)

613 Avenue Create: ATG with twist of Floral Delight (2/8; ends at the end of the month) Top Rocker May 4-10


Classic Design Challenge Blog: ATG with option of feminine; ends 5/12/25

A Perfect Time To Craft Open Challenge: ATG (unlimited entries; ends at the end of the month)

Creative Fingers Challenge Blog: ATG (3/3; ends 5/26/25)


Love To Craft Challenge Blog: ATG (4/5; ends 6/15/25)

Mix It Up Challenge Blog: ATG (4/5; ends 6/15/25)

Paper Rocks Scissors: ATG with paper and/or scissors (4/5; ends at the end of the month)

little red wagon: Goodbye Yellow Brick Road: Use yellow (ends 5/14/25)

Ellibelle's Corner: Ellibelle's Crafty Wednesday: ATG (1/3; ends at the end of the month)


Word Power: ATG with words as the focus (1/3; ends at the end of the month) Top 3 Pick 6/4/25

Sunday, May 4, 2025

Sending Hugs Shaker Card

Have you seen the new challenge colors for Altenew's May Inspiration Challenge? They are perfect for spring! Pink, yellow, and blue are a lovely color palette to work with! 

Yesterday I purchased 2 hibiscus plants as Mother's Day gifts for my wonderful mom and mother-in-law, and I fell in love with the pink blooms! I remembered that I had a hibiscus flower die set from Altenew, so I decided to recreate the flowers on a card and turn it into a fun shaker card, too! I had already created Mother's Day cards for the moms or else I would have definitely turned this into a Mother's Day card. 

I wanted to do some ink blending in the background of this card, so I created a stencil by die cutting the 3rd largest in Altenew's Ornate Nesting Dies set out of the center of an A2 card panel. The negative space left me a great stencil to use on another white A2 card panel. I simply lined up the panels, added a bit of tape to hold things in place, and then ink blended some of Altenew's Arctic ink through the homemade stencil. I thought it looked a little plain, so I then added some stenciling in a few spots using Altenew's Squiggly Lines stencil and the same Arctic ink. 

Then I die cut the next largest die in the Ornate Nesting Die set out of the center of an A2 panel of yellow cardstock. I decided to use the next biggest die because I wanted a white frame to show around the blue background. I added a piece of acetate I had cut just slightly smaller than an A2 panel to the back of the yellow panel and then created my shaker by adding Altenew's 1/4 inch wide by 1/8 inch thick Instant Dimension Foam tape around the sides of the ink-blended panel, adding a bit more in other places that would be hidden by the yellow panel. I added blue, yellow, and pink shaker bits and then adhered the yellow panel on top. 

For the hibiscus flowers, I die cut 2 hibiscus flowers from Altenew's Hibiscus Garden set out of watercolor paper I had used Cherry Bomb Nuvo Shimmer Powder on. You can't really tell in the photos, but there's a slight shimmer to the pink die cuts. I cut the pistil and stamen pieces out of the same yellow cardstock I used for the top panel. After assembling the flowers using both foam tape and liquid glue, I added them to the card using more foam tape. I decided they needed some leaves, so I added a couple small leaves from Altenew's Zero Waste: Berries & Branches die that I had die cut out of cardstock I had watercolored with in light blue. 

I stamped and die cut the sentiment using Altenew's Build-A-Garden: Peruvian Lily set and added that to the center of the card using more foam tape. To finish the card, I added a few Berry Burst Nuvo Stone Drops. 

I've recently become an affiliate for Altenew, so if you are interested in ordering something lovely from Altenew and would like to use my link, thank you very much! Here's the link: Carrie's Altenew affiliate page 


Here's a look at the blooms that inspired my card:


Challenges I'm entering: 


 As You Like It Challenge: Soft or bold colors and why: I love soft colors for floral cards because they are so feminine and pretty (3/3; ends 5/14/25)

613 Avenue Create: ATG with twist of Floral Delight (1/8; ends at the end of the month) Top Rocker May 4-10

Lil Patch of Crafty Friends Challenge ...: ATG (1/3; ends 5/18/25) Top 5 Pick 5/18/25


Cardz 4 Galz: Flowers (2/3; ends 5/14/25)


Word Art Wednesday: ATG (3/5 for the week; 7/10 for the challenge; ends 5/7/25)

Craft Rocket Challenges: Flowers (unlimited; ends at the end of the month)

Beautiful Blossoms Challenge: ATG with flowers as the focus (4/6; ends 5/12/25)

Triple B: ATG with birds, blooms, and/or butterflies (1/3; ends at the end of the month)

Classic Design Challenge Blog: ATG with option of feminine; ends 5/12/25

A Perfect Time To Craft Open Challenge: ATG (unlimited entries; ends at the end of the month)


"Just Us Girls" Challenge: Dies and Flowers (2/3; ends 5/7/25)

Creative Fingers Challenge Blog: ATG (2/3; ends 5/26/25)


Crafts Galore Encore Challenge Blog: ATG (3/3; ends at the end of the month)

Creatalicious Challenges: ATG with option of embossing (3/3; ends 5/14/25)

If You Give a Crafter a Cookie...: Pretty Flowers (125; ends at the end of the month)

Love To Craft Challenge Blog: ATG (3/5; ends 6/15/25)

Mix It Up Challenge Blog: ATG (3/5; ends 6/15/25)

Paper Rocks Scissors: ATG with paper and/or scissors (3/5; ends at the end of the month)

The Crafting Challenge: Flowers (2/3 ends at the end of the month)

The Creative Crafters: ATG (3/3; ends 5/8/25)

fourseasons: Spring (3/3; ends at the end of the month)

Saturday, May 3, 2025

Winged Pop Up Diamond Congrats Card

I love to try new fun folds, and when I saw Iced Images do a video on this Winged Pop Up Diamond Card, I knew I had to try it out! Here's the video if you'd like to have a go at it, too: 5" x 7" Winged Pop-Up Diamond Card. 

My husband and I recently had the opportunity to spend a day aboard my daughter's aircraft carrier for Friends and Family Day, and while we were on the ship, we were able to see one of my daughter's best friends receive a promotion from Petty Officer 3rd Class to Petty Officer 2nd Class. It was wonderful to see the ceremony and be able to congratulate Emily's friend Hea in person! I had sent Hea several cards over the last deployment and even talked to her through What's App a few times while speaking to my daughter, so I felt like I knew her even before I met her in person. I definitely knew I needed to make her a special congratulations card once I returned home, and this is the card I made for her. 

I chose some pretty pattern paper that had been in my stash for AGES and found some coordinating teal and white cardstock for the layers. I trimmed everything according to the measurements in the video linked above and then die cut Altenew's Zero Waste: Berries and Branches die out of a couple pieces of watercolor cardstock I had watercolored using Altenew's Dusk Watercolor Marker Reinker and Altenew's Quinacidrone Magenta watercolor from the Palette Perfection Watercolor Tube Bundle. I die cut the word "congrats" and its shadow using Altenew's Versatile Greetings 2 die set. 

For the back of the card, I die cut the letters of Hea's name using Altenew's Linear Pathway Alpha die set. I thought that added a special touch. 

I've recently become an affiliate for Altenew, so if you are interested in ordering something lovely from Altenew and would like to use my link, thank you very much! Here's the link: Carrie's Altenew affiliate page 


Challenges I'm entering:

Creative Creases #103: ATG with fun fold projects. I'm on the DT so just adding my card for inspiration

Love Those Pretty Papers Challenge: ATG with pattern papers with optional theme of flowers (1/3; ends at the end of the month)

As You Like It Challenge: Soft or bold colors and why: I like to use whichever colors the recipient will like, so for instance, this card has mostly soft colors since my daughter's friend likes teal and pink. (2/3; ends 5/14/25)

Double Trouble Paper Crafting: Thing 1: at least: 3 layers, 2 colors from the clipboard (teal and purple), 1 pattern paper background (1/4; ends 5/12/25)


Word Art Wednesday: ATG (2/5 for the week; 6/10 for the challenge; ends 5/7/25)

Classic Design Challenge Blog: ATG with option of feminine; ends 5/12/25

A Perfect Time To Craft Open Challenge: ATG (unlimited entries; ends at the end of the month)


Colorful Options: My pattern paper matches the colors for this month: (unlimited entries, ends at the end of the month)


Creative Fingers Challenge Blog: ATG (2/3; ends 5/23/25) Top 3 Pick 5/23/25


Crafts Galore Encore Challenge Blog: ATG (2/3; ends at the end of the month)

Creatalicious Challenges: ATG with option of embossing (2/3; ends 5/14/25)


Love To Craft Challenge Blog: ATG (2/5; ends 6/15/25)

Mix It Up Challenge Blog: ATG (2/5; ends 6/15/25)

Paper Rocks Scissors: ATG with paper and/or scissors (2/5; ends at the end of the month)

The Creative Crafters: ATG (2/3; ends 5/8/25)

fourseasons: Spring (ends at the end of the month)
 

Friday, May 2, 2025

Anemone Mother's Day Card for Creative Creases #103

It's time for a new challenge on the Creative Creases blog, and I'm back with a fun fold Mother's Day card for my DT card. This card is for my lovely daughter-in-law who is such a wonderful mother to my two grandchildren. 

To make the card base, I used my Silhouette Cameo 4 to cut out the white and blue pieces for the card base and layers. The cut file is from Lori Whitlock and was purchased in the Silhouette Design Store. After cutting the pieces, I ran the blue layers through my embossing machine with 2 Altenew 3D embossing folders: Festive Greenery and Organic Linen. 

The anemones were die cut using Altenew's Craft-A-Flower: Anemone set. I used cardstock I had sprayed with Brutus Monroe's Blue Violet (both white cardstock and blue cardstock) as well as plain blue cardstock. I layered the pieces together with the black flower centers and adhered everything with Art Glitter glue. I die cut some leaves from the same CAF set out of vellum and added those around the flowers and used Press N Seal to hold the arrangement together as I adhered it all to the black card panel in the center of the card. 

For the "Happy Mother's Day" sentiment, I stamped a Close to My Heart stamp from my stash onto some of the same paper I had sprayed with the Blue Violet spray. I added it to the panel beside the flowers since I didn't want to cover up any of the flowers.

I made a belly band to hold the card closed and added another anemone to the front of the belly band to finish the card. 

If you'd like to join the fun over at Creative Creases Challenge where it's always anything goes with a fun fold project, please add your beautiful work to this link: Creative Creases #103


I've recently become an affiliate for Altenew, so if you are interested in ordering something lovely from Altenew and would like to use my link, thank you very much! Here's the link: Carrie's Altenew affiliate page 


Card when fully opened:


Card when closed with the belly band on:


Card without the belly band on:


Side view:


Another view:


Challenges I'm entering:

As You Like It Challenge: Soft or bold colors and why: I like to use whichever colors the recipient will like, so for instance, this card has bold colors because my daughter-in-law's favorite color is periwinkle, and I paired that with black and white. (1/3; ends 5/14/25)

Double D Challenges: Springtime Flowers (1/3; ends 5/4/25)

Cardz 4 Galz: Flowers (1/3; ends 5/14/25)


Word Art Wednesday: ATG (1/5 for the week; 5/10 for the challenge; ends 5/7/25)

Gem of A Craft Challenge: ATG (4/4; ends 5/8/25)

Craft Rocket Challenges: Flowers (unlimited; ends at the end of the month)

Allsorts challenge blog: Inspired by a song or ATG (3/3; ends 5/9/25)

Beautiful Blossoms Challenge: ATG with flowers as the focus (3/6; ends 5/12/25)

Classic Design Challenge Blog: ATG with option of feminine; ends 5/12/25

Can You Handle The Pressure?: ATG with an embossing folder with optional twist of weather (3/3; ends 5/7/25) Top Winner 5/9/25

A Perfect Time To Craft Open Challenge: ATG (unlimited entries; ends at the end of the month)


Pearly Sparkles Challenge Blog: Black and White + 1 color (1/3; ends at the end of the month)

Colorful Options: I chose blue and black from the inspiration photo: (unlimited entries, ends at the end of the month)


"Just Us Girls" Challenge: Dies and Flowers (1/3; ends 5/7/25)

Creative Fingers Challenge Blog: ATG (1/3; ends 5/23/25) Top 3 Pick 5/23/25


Crafts Galore Encore Challenge Blog: ATG (1/3; ends at the end of the month)

Creatalicious Challenges: ATG with option of embossing (1/3; ends 5/14/25)


If You Give a Crafter a Cookie...: Pretty Flowers (1/5; ends at the end of the month)

Love To Craft Challenge Blog: ATG (1/5; ends 6/15/25)

Mix It Up Challenge Blog: ATG (1/5; ends 6/15/25)

Paper Rocks Scissors: ATG with paper and/or scissors (1/5; ends at the end of the month)

The Crafting Challenge: Flowers (1/3 ends at the end of the month)

The Creative Crafters: ATG (1/3; ends 5/8/25)

fourseasons: Spring (ends at the end of the month)