Tuesday, February 7, 2023

I Love You Slow Much Card

The idea for this Valentine card came from Lisa Curcio's Double Door Pop-Up Card video which you can view here: 🔴Surprise & Delight with this Double Door Pop Up Birthday Card - YouTube. I modified the inside of the card so that instead of a top-fold card inside, (spoiler alert!) I have 2 pop-up sloths😁. 

Using Lisa's measurements, I created a cut file for this card using my Silhouette Design Studio software. It was a bit tricky to create the mechanism that makes the inner doors pop open, but otherwise this was an easy card to create a cut file for because it is mostly just rectangles and some vertical score lines. I love the design and am definitely planning to revisit this style of card later using the inner top fold card next time.

I chose some pretty Valentine card stock that has hearts on one side and some gold foil, balloons, cupids, and flowers on the other side. I used Art Impressions' Sloth Pop-Ups (a stamp and die set) and Sloth-Some stamp set to decorate the card. I love puns, and the puns in the Sloth-Some set really sold me on buying the set! Then I couldn't resist the pop up sloth stamp and die set! It's so cute! The pop-up stamp and die set is on clearance for just $5.25 right now for all you sloth lovers! Here's the link: 5357 – Sloth Pop-Ups – Art Impressions.

I used my MISTI for all the stamping on this card. First, I stamped the focal point onto white card stock and colored my little sloth with Copic and Chameleon markers. I wanted to keep things mostly pink, so my sloths are all in shades of pink. The theme at Double Trouble is "Love is in the Air," so I chose the sloth who is hugging a balloon. Isn't it cute how the balloon has a heart shape at the top? 

For the inside of the card, I cut out the "doors" and adhered the heart side of the design paper to the front of the doors and the reverse side of the design paper to the inside of the doors. There's a bit of gold foil trim at the bottom of the doors that I really liked as it goes with the gold trim at the top of the card. I also added another layer to the bottom of the focal point that shows when the flap is lifted. I wasn't planning to do that, but the back side of the patterned paper had the hearts upside down because I didn't check how it looked on the back before adhering my stamped image onto it😂. I like seeing the balloon bouquet better than more of the heart pattern anyway as it coordinates with the balloons I cut out for the sides of the card, so it all turned out for the best! 

I die cut a heart shape using a Gina Marie Designs stitched heart die and then stamped "I love you slow much" on the center of the heart. I adhered that to the center of the inside panel. 

Then I stamped and die cut the 2 sloth pop ups using the special pop-up die that also creates score lines on the stamped image so you know where to fold the pop up. It was a little tricky at first, so I checked to see if there were any videos on using the pop-up dies. Sure enough, once I watched the video Art Impressions posted with instructions for their pop-up dies, it was easy to know how to fold it and where to glue. 

I heat set the sloths before coloring them, but I still had a bit of smearing with my black ink. I probably should have waited to let them dry overnight. I colored them with my Copic and Chameleon markers and then adhered them to the inside of the card. The placement was a bit tricky as I needed both of them to fold down and fit inside the doors of the card, but thankfully they were able to fit with a little maneuvering. 

To finish the card, I added a few puffy heart stickers to the front: 2 gold and one light pink. 

Here's a look at the front of the card when it's standing up (notice how Cupid is hugging a heart on the design paper at the top right? I love how it looks like he's mimicking the sloth on the front!):


I have to pinch it to keep it flat, but it will be fine in an envelope:


Here's a look when the top flap is opened:


Here the doors are opening up, and you can see the sloths unfolding:


Nearly fully unfolded:


Fully unfolded:


Close up of the sentiment:


Here's a screen shot of the cut file I created in Silhouette Design Studio in case you are curious about how that looks. I used Lisa Curcio's measurements to create the cut file and added colors to the pieces so I could see which ones should be cut from the various card stock and pattern papers I chose:


Challenges I'm entering: 

Art Impressions Blog: You're My Everything Challenge #344 (artimpressionsstamps.blogspot.com): Card for someone you love or a Valentine's card (2/2; ends Feb. 15)

https://www.simonsaysstampblog.com/wednesdaychallenge/: Love is in the air (3/5; ends Feb. 9)

https://www.simonsaysstampblog.com/mondaychallenge: Love is in the air (1/5; ends Feb. 14)

Incy Wincy Designs Challenge -1st to the 25th every month: Valentine or in the garden (3/5; ends at the end of the month)

Double Trouble Paper Crafting (doubletroublechallenge.blogspot.com): Love is in the air (I used balloons😃) (1/4; ends Feb. 19)

Inspiration Station (inspirationstationchallenge.blogspot.com): Inspiration photo shows hearts and indicates the couple is in love. My card also has hearts on it and is about love: 


Colorful Options: Pink (unlimited entries; ends at the end of the  month)

The Diva's that cut ....paper! (die-cut-divas.blogspot.com): Add some gold (gold foil on the design paper and gold puffy hearts as embellishments)😃 (2/4; ends at the end of the month)

Let's Craft and Create (letscreatechallenges.blogspot.com): ATG with option: Use a sentiment (2/3; ends at the end of the month)

February Mood Board Card Challenge (not2shabbyshop.com): I chose the colors from the mood board (2/3; ends at the end of the month)


The Paper Funday Challenges: ATG with twist to add lots of layers (I have extra layers on the front focal point, the sides and top, and the doors inside the card) (3/6; ends at the end of the month)


Allsorts challenge blog: ATG with option of "I love..." (2/3; ends Feb. 11)

digidesignchallengeblog (disdigidesignschallenge.blogspot.com): Add one or more hearts (3/3; ends Feb. 17)

613 Avenue Create (avenue613.blogspot.com): ATG with option of use red for anything but a heart (2/8; ends at the end of the month)

Challenge – Dare 2B Artzy Blog: Love (2/3; ends at the end of the month)


Stamping Sensations (sirstampalotchallenge.blogspot.com): ATG with stamping (1/3; ends at the end of the month) 

We Love Stamping: ATG with stamping as the focal point and the option of adding a stencil (1/3; ends at the end of the month)

We Love to Create mixed media Challenge Blog...sponsored by Polkadoodles (welove2create.blogspot.com): ATG with mixed media (I used alcohol markers) (unlimited entries; ends at the end of the month)

Word Art Wednesday: ATG (3/5 for the week; ends Feb. 15)

Park Hopping, My happy place (parkhoppingmyhappyplace.com): Anything theme-park related: It turns out there are two-toed sloths at Disney's Animal Kingdom! They are apparently in the Rafiki's Planet Watch area of the park (unlimited entries; ends at the end of the month)

 Scribble Challenge (rabiscochallenge.blogspot.com): ATG (1/5; ends at the end of the month)

A Perfect Time To Craft Open Challenge: ATG (unlimited entries; ends at the end of the month)


Sunday, February 5, 2023

1 Corinthians 13 Flip Card

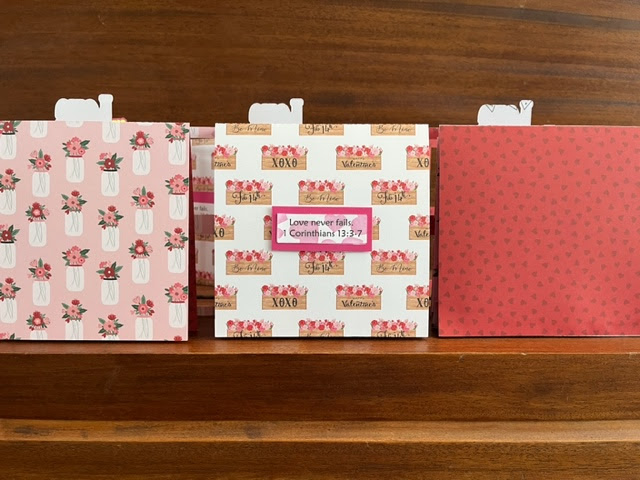
This week's card for the shut ins I regularly send happy mail to features an electronic cut file generously shared by Sabine Harris in the Silhouette Card Making and Paper Crafting FB group. I resized it a bit to fit two card bases on each sheet of 12X12 paper and used my Silhouette Cameo 4 to cut out the file. I chose some pretty Valentine-themed papers and mixed and matched them to create 7 cards. 

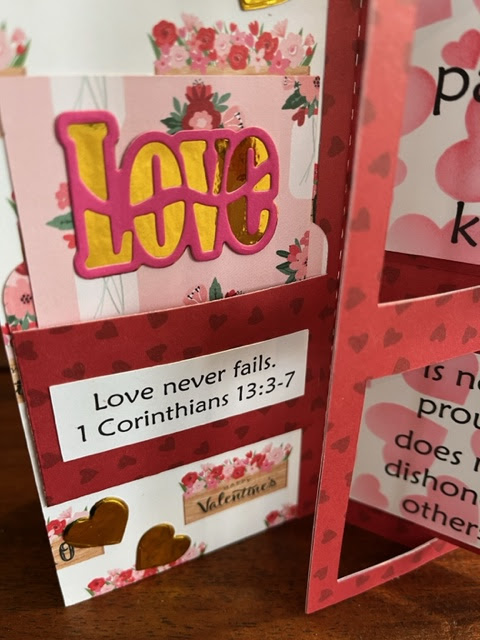
What's fun about these cards is that they have a flip mechanism that lets you put a message on both sides of each of the 4 squares. Since Valentine's Day is coming up, I wanted to choose a verse about love for these cards, and 1 Corinthians 13:3-7 is a wonderful passage to reflect on regarding what genuine love is like. I broke the passage down into segments that would fit on the front and back of the 4 squares of the card and then used Maiandra font to type up the attributes of love mentioned in that passage. I did a print and cut of the squares and then used a heart stencil from Creative Expressions to add some pretty hearts to each square. 

I recently won a stamp and die kit from Tonic Studios through a Word Art Wednesday blog hop (thanks so much, Karen!), and in the kit is a set of dies for the word Love. There are two dies since the inner die doesn't cut out an outline on its own. I die cut the inner word die with the outline die using some Valentine colors (most of them are pink, but I also did a couple red ones) and then I die cut just the outline die using white card stock I had covered with metallic gold duct tape for a gold foil effect. I used that same gold-covered card stock to die cut some small hearts from the Hero Arts Library Card stamp and die set. If you're not familiar with that technique, I heard about it on Lydia Fieldler's blog Understand Blue. She mentioned it had the same effect as foiling a die cut, and it works great! Here's a link to the tape she recommended if you'd like to give it a try (it's what I used for this card): AmazonSmile: Metallic Tape Mirror Tape Duct Tape DIY Decorative Tapes, 2.4 Inches x 55 Yards (Gold) : Industrial & Scientific

I did a print and cut of the last verse in the passage: "Love never fails." I experimented with where I wanted to place it and adhered it to the front, inside, and back of different cards.  I haven't really decided which way I like it best. I also added the "Love" die cut in different places. I really like it best at the top of the card, and thankfully I have some oversized envelopes that will work with the die cut sticking up like that. If you only have 6X6 envelopes, you won't want to add anything to the top of these cards.

On one of the cards, I added a library card pocket I die cut using the same Hero Arts Library Card set I took the heart die from. I thought that was a fun little detail to add, but I found that the flip mechanism has a tendency to stick a bit if there's anything with a little dimension on the side it folds down on. I also had trouble when I attached the "Love" die cut there using foam tape. It's fine when it's adhered with liquid glue, but the foam tape made the flip mechanism catch a bit. 

These cards were a bit time-consuming to make, but I love how fun they are and the way they really showcase this passage about love. I'm praying the Lord will help me show this kind of love to everyone around me. I fall terribly short of the description here, but thankfully the Lord is merciful, and He Himself demonstrates this perfect love to sinners like me. 


Here's a look at the two sides of the 4 squares:


A close up of the first side:


A close up of the flip side on a card where I used Gina Marie Stitched Squares die cut in gold as the background for the squares with the verses:


Video showing the flip:


Here's a look at the Hero Arts Library Card pocket and heart die cuts:


I used a stitched banner die from the Tonic Studio set the Love die came from here:


Side view: 


I reversed where the flip mechanism was on this one. It works on either side:


A look at the back of one of the cards:


A few more photos of the cards:


Here's a look at the heart stencil I used. It was such a perfect size for these little squares!


Challenges I'm entering:

Anything Goes with a Fun Fold for Creative Creases #50 (secretstamper.com): ATG with a fun fold (ends Feb. 17) Top Pick Winner 2/17/23

Colorful Options: Pink is the color of the month (ends at the end of the month)

The Paper Shelter: Pink or bows (2/2; ends Feb. 8)

https://www.simonsaysstampblog.com/wednesdaychallenge/: Love (2/5; ends Feb. 8)

The Paper Funday Challenges: ATG (2/6; ends at the end of the month)

Word Art Wednesday: ATG (2/5 for the week; ends Feb. 15)

The Diva's that cut ....paper! (die-cut-divas.blogspot.com): Die cut and gold (1/4; ends at the end of the month)

Incy Wincy Designs Challenge -1st to the 25th every month: Valentine or in the garden (2/5; ends at the end of the month)

Let's Craft and Create (letscreatechallenges.blogspot.com): ATG plus option of adding a sentiment (1/3; ends at the end of the month)

Creative Fingers Challenge Blog: ATG (1/3; ends Feb. 10)


Allsorts challenge blog: ATG with option of "I love..." I love God's Word and how it guides us to know Him better, love Him more, and have wisdom to live rightly (1/3; ends Feb. 8)

digidesignchallengeblog (disdigidesignschallenge.blogspot.com): Add one or more hearts (2/3; ends Feb. 17)

613 Avenue Create (avenue613.blogspot.com): ATG with option of use anything for red but a heart (1/8; ends at the end of the month)

Challenge – Dare 2B Artzy Blog: Love (1/3; ends at the end of the month)


Digi Choosday Cardmaking & Crafting Challenge: ATG (1/2; ends Feb. 13) Top 3 Favorite 2/14/23

Double Trouble Paper Crafting (doubletroublechallenge.blogspot.com): Thing 1: stitching (there's stitching on the banner I used on one of the cards as well as the gold squares I used--I made a note in the pictures) (2/4; ends Feb. 5)


A Perfect Time To Craft Open Challenge: ATG (unlimited entries; ends at the end of the month)


Friday, February 3, 2023

Guest Design Card for Creative Creases: Double Tucked Corner Fold Card

I have the privilege of being the Guest Designer for Creative Creases Challenge #50! Debbie, congratulations on your 50th challenge! That's quite a milestone! I love fun fold cards and have found lots of lovely card designs and inspiration at the Creative Creases Challenge. If you enjoy making fun fold cards, please share your creations here: https://secretstamper.com/2023/02/anything-goes-with-a-fun-fold-for-creative-creases-50/

The idea for this card design comes from Iced Images on YouTube. You can view the video about this card style here: 6x6 Double Tucked Corner Fold Card - YouTube. I modified the measurements in the video slightly and created a cut file in my Silhouette Design Studio software so that I could cut out multiples quickly. I made several similar cards for the shut ins I send cards to regularly by using the cut file I created for this card. 

Last fall I become a hobby Stampin' Up! demonstrator under Debbie Mageed, and in January, Debbie generously gifted me my choice of a SU! bundle for being in her downline. I chose the Framed Florets bundle, and since Sale-A-Bration is currently going on, I was able to also receive a free set of gorgeous design papers along with the bundle. (If you are interested in any SU! products, now is a great time to purchase them since you can receive free paper or stamp sets with every $50 you spend. Here's a link to Debbie's blog where you can find more details about Sale-A-Bration:  Host Code (stampinup.net)). I mention all this because I decided to use some of the stamps and dies from the beautiful Framed Florets bundle along with some of the lovely Sale-A-Bration design papers for this card. Here's a link to the Framed Florets bundle if you are interested in this beautiful stamp and die set: Framed Florets Stamp & Die Bundle by Stampin’ Up! (stampinup.com)

After cutting out the card base and layering pieces, I chose a scripture word art for the focal point. I purchased the word art from the Silhouette Design Store, and since it didn't come with the reference, I added that to the word art and sized it to fit within the frame I wanted to use before doing a print and cut with my Silhouette Cameo 4. With Valentine's Day around the corner, I thought I'd choose a verse about God's love. What a comfort to know the Lord's love never ends! It's infinite! And thankfully it's not dependent on our actions but on who He is! Praise God that we never have to worry that He'll stop loving us no matter what we've done or failed to do. 

I used several stamps and dies from the Framed Florets bundle to frame up the focal point, stamp and die cut a floral spray to the top right and left inside the card, and frame up and decorate the sentiment on the back of the card. I colored the stamped images with Copic and Chameleon alcohol markers. Final touches were adding 3 adorable puffy heart stickers around the focal point and tiny gems to the stamped flower centers inside and on the back of the card. 

Front view: 


Partially unfolded:


Completely open:


Close up of the verse: 


Top left:


Top right:


Back of the card:


Close up of the sentiment on the back:


Side views:


Here's a picture of the Stampin' UP! Framed Florets bundle I used:


Challenges I'm entering: 

Beautiful Blossoms Challenge: Flowers as the focus (2/8; ends Feb. 15)

Word Art Wednesday: ATG (1/5 for the week; 1/10 for the challenge; ends Feb. 15) Random winner 2/15/23: $25 gift certificate to Top Flight Stamps

The Paper Funday Challenges: ATG with optional twist of lots of layers

https://www.simonsaysstampblog.com/wednesdaychallenge/: Love (1/5; ends Feb. 8)

The Paper Shelter: Bows and/or Pink (1/2; ends Feb. 8)

Art Impressions Blog: You're My Everything Challenge #344 (artimpressionsstamps.blogspot.com): Cards for someone you love or Valentine cards (the sentiment on the back reminds the recipient they are loved, so I hope that counts as the focal point is about God's love for all people) (1/2; ends Feb. 15)

Girlz Creative Crafts: More than 1 fold (ends Feb. 15)

Incy Wincy Designs Challenge -1st to the 25th every month: Valentine or In the Garden (I chose in the garden, but it's also a valentine of sorts since the focus is on God's love for us) (1/5; ends Feb. 28)

February Mood Board Card Challenge (not2shabbyshop.com): Mood board: I took the pink flowers as inspiration (1/3; ends at the end of the month)


digidesignchallengeblog (disdigidesignschallenge.blogspot.com): Add one or more hearts (I have a heart frame around the inside sentiment): (1/3; ends Feb. 18)

Lil Patch of Crafty Friends Challenge ...: ATG (1/3; ends Feb 5)

We Love to Create mixed media Challenge Blog...sponsored by Polkadoodles (welove2create.blogspot.com): ATG mixed media (I used alcohol markers) (ends Feb. 24)


Passion for Markers (promarkerchallenge.blogspot.com): Use a die cut (I die cut the stamped flower images and colored them with Copic and Chameleon markers) (no limit; ends Feb. 7)

Make My Monday Challenge Blog (mmmchallengeblog.blogspot.com): Love is in the air (my sentiment on the inside is about God's love, and the sentiment on the back is a reminder that the recipient is loved) (1/3; ends Feb. 12)

Double D Challenges (daranddiane.blogspot.com): Hearts: I used a die that cut out hearts all around the sentiment) (3/3; ends Feb. 12)

A Perfect Time To Craft Open Challenge: ATG (unlimited entries; ends at the end of the month)


Monday, January 30, 2023

Stuck On You Valentine Card

This Valentine card uses an image from Miss Kate Cuttables and a sentiment from an Art Impressions stamp set and follows the sketch from MFT Sketch Challenge. I thought those little cactus plants were just darling and wanted to use them in a Valentine card. 


Challenges I'm entering:

Welcome to Wednesday: Save 40% Sitewide + 50% off All Featured Blitzda – MFT Stamps (ends 1/31)


****Pammie's Inky Pinkies**** **********Challenges********** (pammiesinkypinkieschallenges.blogspot.com): CAS (1/3; ends Feb. 5) C10

You Are One in a Melon Card


The design for this card comes from the MFT Sketch Challenge. I used an image from Miss Kate Cuttables (the watermelons) and then stamps from Paper Sweeties (the sentiment and the watermelon border). The stitched circle and stitched heart dies I used are from Gina Marie Designs. I used my Copic markers to color the border. I added some embellishments to the top to finish it off. 


Creations in Pink: ATG in mainly pink (3/3; ends Feb. 15) 

https://www.simonsaysstampblog.com/mondaychallenge: Food and/or drink (1/5; ends Feb. 6)

https://www.simonsaysstampblog.com/wednesdaychallenge: ATG (4/5; ends Feb. 1)
 

As You Like It Challenge: Favorite color and why: I love pink for Valentine cards as it's so iconic as a color to represent love. (1/3; ends Feb.8)

Love You A Bunch Card

The MFT sketch for this week is a fun one, so I'm playing along! I decided to use my new Thanks A Bunch Stampin' Up! stamp set to create a card following the sketch. First, I used my ink blending brushes to add some yellow circles where the sketch features 3 circles of varying size. The sketch also features a horizontal line near the center, so I stamped one of the smaller stamps 6 times in a line to create that part of the card. Then I stamped the carrots and their green tops and the two sentiments. So quick and easy to make! If you're interested in earning the Thanks A Bunch stamp set for free (it's part of Sale-A-Bration and is free with a $50 purchase), check out this link to my friend Debbie Mageed's Stampin' Up! page here: Sale-A-Bration (stampinup.com)


Thanks A Bunch stamp set:


Challenges I'm entering:

Welcome to Wednesday: Save 40% Sitewide + 50% off All Featured Blitzda – MFT Stamps (ends 1/31)


https://www.simonsaysstampblog.com/mondaychallenge: Food and/or drink (2/5; ends Feb. 6)
 

https://www.simonsaysstampblog.com/wednesdaychallenge: ATG (5/5; ends Feb. 1) Random winner 2/1/23

Lawn Fawn Slimline Valentine Card


 Challenges | Lawn Fawnatics: Lots of heart (ends Feb. 5)

Creations in Pink: ATG in mainly pink (2/3; ends Feb. 15)

As You Like It Challenge: Favorite color and why: I love pink for Valentine cards as it's so iconic as a color to represent love. (2/3; ends Feb.8)