Friday, July 4, 2025

Congrats Mixed Media Card

I recently attended a great mixed media class taught by Altenew Educator Carrianne Banul. It was fun to play with stencils, paste, ink, and metallic thread! Everyone in the class had a unique card, and I loved seeing everyone's take on Carrieanne's techniques.

I started by spritzing Altenew Warm Sunshine Metallic Shimmer Ink Spray on 2 watercolor panels cut to A2 size. Then I spritzed some Brutus Monroe Coral Chroma Mist onto the panels. I really love the combination of Yellow and Coral together!

For the panel that would become the card front, I spread Altenew's Brushed Pyrite Shimmer Relief Paste through Altenew's Scattered Tiles stencil and then used my heat tool on it to dry it slightly. Normally I would have left it to dry overnight, but we were doing everything in real time during the class, and the instructor also stamped over her shimmer relief paste before it was dry. The stamping actually left a cool impression in the paste that looks like tiny dots since I was using Altenew's Dotted Pinwheel stamp to stamp in random spots on the panel. 

The next step was to add a flower die cut and a sentiment to the panel, but I felt like my Craft-A-Flower: Daisy got lost against the similarly colored background. I decided to try out a new die set I just purchased recently called Fine Frames: Squares from Altenew. It die cuts a very thin frame as well as the inner square, and so I used it on black mixed media cardstock I had sprayed with Altenew's Antique Gold Shimmer Ink Spray as well as on plain black cardstock. I die cut two layers of the plain black cardstock, adhered them together, and then adhered the frame from the sprayed mixed media cardstock around the plain black square. I added black metallic thread with foam tape and then popped up the daisy onto the foam tape. 

For the "congrats" sentiment, I die cut the words "congrats" twice out of black cardstock using Altenew's Versatile Greetings 2 set and adhered the die cuts together. Then I trimmed the word into 4 sections and adhered them to the card beside the daisy. 

For the inside of the card, I took the other piece of watercolor cardstock I had sprayed with Warm Sunshine and Coral sprays and stamped "You...are amazing, inspire me every day, are shining" using sentiments from Altenew's Vintage Garden. Then I added a gold die cut from Altenew's Zero Waste: Berries & Branches die to finish the inside of the card. 

This special congrats card is going to my oldest daughter. She recently competed in the Cheese Monger Invitational in New York City and took first place in two of the events. I'm so proud of her for all the hard work she did to prepare for the contest and for her bravery to go to NYC and compete. She is on the spectrum, and events with unfamiliar people in unfamiliar places are extra tough. 

I've recently become an affiliate for Altenew, so if you are interested in ordering something lovely from Altenew and would like to use my link, thank you very much! Here's the link: Carrie's Altenew affiliate page 


Inside the card:


Challenges I'm entering: 

fourseasons: ATG Summer (ends at the end of the month)

Paper Rocks Scissors: ATG with paper and/or scissors (2/5; ends at the end of the month)

Mix It Up Challenge Blog: ATG with optional Mixed Media (2/5; ends at the end of August)

Love To Craft Challenge Blog: ATG (2/5; ends at the end of August)

Crafts Galore Encore Challenge Blog: ATG (2/3; ends at the end of the month)

Classic Design Challenge Blog: ATG (unlimited entries; ends 7/12/25)

A Perfect Time To Craft Open Challenge: ATG (unlimited entries; ends at the end of the month)


Cardz 4 Galz: Welcome to summer (1/3; ends 7/9/25)

Crazy is our fame - STENCILS are our game!: ATG with stencils; optional theme to add your flag colors (1/3; ends at the end of the month)

Tic Tac Toe Challenge - Inspiring creativity 8-ways each week Layers (I have layers of sprays, paste, and stamping), free, summer colors (2/3; ends 7/17/25)

Word Power: ATG with words as the focus (1/3; ends at the end of the  month)

Creative Fingers Challenge Blog: ATG (3/3; ends 7/11/25)

Crafty Catz: ATG (3/3; ends 7/11/25)

Word Art Wednesday: ATG (3/5 for the week; 3/10 for the challenge; ends 7/16/25)

The Paper Funday Challenges: ATG with optional twist of Fun with Stencils (I used a stencil with Shimmer Relief Paste on my card) (1/6; ends at the end of the month)

simonsaysstampblog.com/wednesdaychallenge/: Sending Flowers (2/5; ends 7/9/25)

little red wagon: Bold or bright colors (ends 7/8/25)


Poinsettia Corner Tuck Fold Card

I don't know about you, but I always enjoy a Christmas in July card! It's swelteringly hot and humid here in Michigan, so it's nice to think about cooler temps! 

I recently received Box #11 from Your Paper Insider in exchange for creating a project with the papers and posting it on social media with their hashtag, and I have been thrilled with the papers in the box! If you'd like to see the first card I made with their papers, check out this link: Carrie's Custom Cards: Slatted Z-Fold Birthday Card for Your Paper Insider. Of course, with so many wonderful papers in Box #11, I couldn't stop at just one card! 😂 I have so many ideas in mind for the specialty papers! For card #2, I chose 4 of the papers from Box #11: Lavender Glitter Gloss for the poinsettia, Fairway Metallic Snapdragon for the leaves, Champagne Foil for the metallic pieces, and White Linen Acryl Art Board for the card base. I love the glitter gloss papers in Box #11 because they sparkle but don't shed! 

For the Corner Tuck Fold card design, I followed Susan Campfield's tutorial here: Pretty in Pink! Corner Tuck Fold Card with the Coneflower Celebration! I used Altenew's Perfect Poinsettias 3D embossing folder, Altenew's Poinsettia 3D die set, and Altenew's Fancy Peace die for all the embossing and die cutting on the card. I also used Altenew's Instant Dimension Foam Tape for some of the layers on the poinsettia to give the poinsettia quite a bit of dimension. 

To finish the card, I added a few CTMH gold sparkle dots. 

I've recently become an affiliate for Altenew, so if you are interested in ordering something lovely from Altenew and would like to use my link, thank you very much! Here's the link: Carrie's Altenew affiliate page 


Here's where the side of the panel with the poinsettia gets tucked into the embossed corner panel. The embossed panel has Instant Dimension Foam Tape on the outside edges but no tape in the center section so the flap can tuck underneath it:


Here's a look at the papers I used for the card:

Challenges I'm entering: 

C.R.A.F.T. Challenge: Christmas (2/3; ends 7/9/25)

Craft Rocket Challenges: Christmas in July (ends at the end of the month)

Creative Inspiration Challenges: ATG (2/2; ends at the end of the month)

Creative Knockouts: Christmas in July (1/3; ends 7/17/25) C10

The Paper Shelter: Christmas in July (1/2; ends 7/9/25)

Fab 'n' Funky Challenges: Christmas in July (1/2; ends 7/15/25)

Can You Handle The Pressure?: ATG with an embossing folder (1/3;ends 7/9/25)

Word Art Wednesday: ATG (1/5 for the week; 1/10 for the challenge; ends 7/16/25)

simonsaysstampblog.com/wednesdaychallenge/: Sending Flowers (2/5; ends 7/9/25)

Tic Tac Toe Challenge - Inspiring creativity 8-ways each week Foliage, layers, flower 

No more challenges. 


Double Split Panel Easel Card for Creative Creases Challenge #105

It's time for a new challenge over on the Creative Creases Challenge blog, and I thought I'd go with a winter in July theme! It's been blistering hot and humid here in Michigan recently, so snowflakes sound lovely!

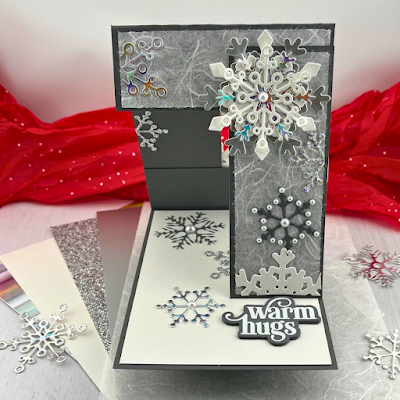
For my snowflake card, I chose a fun fold I've never seen before. The inspiration comes from Elodie Tanchaud, a French cardmaker who goes by @elostamp. Here's a link to her written instructions on her blog: Tutoriel : Carte chevalet -. The instructions are in French, which was a lot of fun for me! My degree is in secondary education for French and Social Studies, and I was a French tutor (among a dozen or so other subjects) with an online tutoring company for many years. Anyway, I first planned to convert the measurements from centimeters to inches, but my paper trimmer and scorer has centimeters as well as inches on it, so I just went ahead and followed all the metric measurements. I made a template first, and I think I'll work on adjusting the template slightly so the card is a bit shorter. It wound up being 4 1/8 by 5 13/16 inches, so just a little too long for an A2 envelope, but it would be easy enough to adjust the length. I like to create templates of the fun folds I try, and I store them with the instruction sheets in page protectors so I can easily refer to them later. 

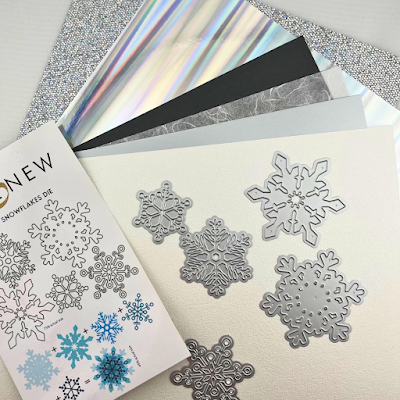
I recently received Box #11 from Your Paper Insider in exchange for creating a project with the papers and posting it on social media with their hashtag, and I have been thrilled with the papers in the box! If you'd like to see the first card I made with their papers, check out this link: Carrie's Custom Cards: Slatted Z-Fold Birthday Card for Your Paper Insider. Of course, with so many wonderful papers in Box #11, I couldn't stop at just one card! 😂 There are several gorgeous metallic, pearlescent, and sparkly papers in the box, and I thought they would be great for this snowflake card. There's also a thick gray cardstock that I thought would be great for the base layers. So to create this card, I started by trimming and scoring all the pieces for the card base and layers. Then I adhered them together to create the split panels for the easel card. Next, I die cut snowflake layers out of my specialty papers from Box #11 using Altenew's Layered Snowflakes die set. The white snowflake layers are a lovely pearlescent that has some pretty shimmer to it in person. I struggle to capture metallics, pearlescent, and holographic papers in my photos, so if you have any suggestions, please leave me a comment. These are the papers I used for the card: Silver Lustre Cadillac (a flat metallic gray), Silver Holographic Double Pillars (great shine in person!), Wrought Iron Gray Enviro Raw (for the card base), Vanilla Pearl Cosmo Odeon, White Thai Unryu (this is the paper on the gray layers that I thought looked a bit like a snowy background with the pretty white fibers in it), and Luster Diamond Glitter (so much fun sparkle on that one!). 

For the sentiment, I stamped and die cut "Warm hugs" using Altenew's Pumpkin Patch stamp and coordinating die set. I used VersaMark ink to stamp the sentiment and then heat embossed it using white embossing powder. I die cut the coordinating die 3 more times with the Wrought Iron Gray cardstock, which is a thick cardstock and worked great to create layers behind the sentiment so it has some dimension to serve as the stopper for the easel panel. 

I hope you'll join the fun over on the Creative Creases Challenge blog this month with your own fun fold projects! Here's a link for fun fold inspiration and to add your creations: https://wp.me/p4bS0N-cpU 

I've recently become an affiliate for Altenew, so if you are interested in ordering something lovely from Altenew and would like to use my link, thank you very much! Here's the link: Carrie's Altenew affiliate page 


The inside panel of the card stands up like an easel:


More views:


Top view: 


The card folds flat for mailing. Simply fold down the panel that rests against the sentiment:


A look at the papers from Your Paper Insider Box #11 
that I used for this card:


Challenges I'm entering: 


Christmas BINGO Challenges: Letter O: fancy fold card base, ivory, and embossing (my sentiment is heat embossed) (1/8; ends mid-August) 

As You Like It Challenge: Favorite color combination and why: I love gray/silver and white for winter cards because I think they create a look of elegance for snowy winter scenes (3/3; ends 7/9/25)

C.R.A.F.T. Challenge: Christmas (2/3; ends 7/9/25)

Craft Rocket Challenges: Christmas in July (ends at the end of the month)

Creative Inspiration Challenges: ATG (1/2; ends at the end of the month)

Paper Rocks Scissors: ATG with paper and/or scissors (1/5; ends at the end of the month)

Mix It Up Challenge Blog: ATG with optional Mixed Media (1/5; ends at the end of August)

Love To Craft Challenge Blog: ATG (1/5; ends at the end of August)

Crafts Galore Encore Challenge Blog: ATG (1/3; ends at the end of the month)

Classic Design Challenge Blog: ATG (unlimited entries; ends 7/12/25)

A Perfect Time To Craft Open Challenge: ATG (unlimited entries; ends at the end of the month)

Creative Fingers Challenge Blog: ATG (2/3; ends 7/11/25)

Crafty Catz: ATG (2/3; ends 7/11/25)

Word Art Wednesday: ATG (2/5 for the week; 2/10 for the challenge; ends 7/16/25)

The Paper Funday Challenges: ATG with optional twist of Fun with Stencils (1/6; ends at the end of the month)


Tuesday, July 1, 2025

Thank You Card for A Perfect Time To Craft

I was blessed to win 1st Prize in the January challenge over on the A Perfect Time to Craft blog, and one of the perks besides the lovely digital papers I won was the opportunity to be a Guest Designer for the July challenge. For being a Guest Designer, I had my choice of another of Anne Constantly-Carding's beautiful sets of digital papers, and I chose the lovely Starry Night set which you can purchase here: Starry Night Alcohol Ink Background Set - Payhip. The set is full of gorgeous alcohol ink backgrounds. 

I wanted to use the beautiful digital alcohol ink papers for my card, so I started by printing out the first paper in the set and noticed it had lovely white splatters in the design. I decided the colors would look great on a black background, so I trimmed a panel of black cardstock to 3 1/2" by 6" and added splatters of Altenew's Titanium White Gouache I had spritzed with a little water. For my card base, I created a white mini slimline card base that is 3 3/4" by 6 1/4". 

To create the flowers and leaves, I die cut Altenew's Amaryllis set using the Starry Night digital paper. Then I arranged the flowers and leaves the way I wanted them on the black panel and added glue and Altenew's Instant Dimension Foam Tape to adhere them to the panel. I then added a piece of black fun foam I had trimmed to 3 1/4" by 5 3/4" and added that to the back of the panel before adhering the panel to my white card base. 

For the sentiment, I stamped and die cut the "thanks" sentiment using Altenew's Build-A-Garden: Bougainvillea set. I used the die to die cut an additional layer out of black fun foam so the sentiment pops up a bit.

If you'd like to participate in the A Perfect Time to Craft challenge, it's always anything goes, and you can add your projects here: A Perfect Time To Craft Open Challenge. I hope I'll see you in the gallery this month! 😊

I've recently become an affiliate for Altenew, so if you are interested in ordering something lovely from Altenew and would like to use my link, thank you very much! Here's the link: Carrie's Altenew affiliate page 


 Challenges I'm entering: 

Allsorts challenge blog: Seaside or ATG (5/5; ends 7/4/25)

Word Art Wednesday: ATG (5/5 for the week; 10/10 for the challenge; ends 7/2/25)


Dream Valley Challenge: ATG (2/3; ends 7/18/25)

Crafty Catz: ATG (2/5; ends 7/10/25)

Creative Fingers Challenge Blog: ATG (2/3; ends 7/10/25)

Monday, June 30, 2025

Sending Hugs Wedge Panel Card

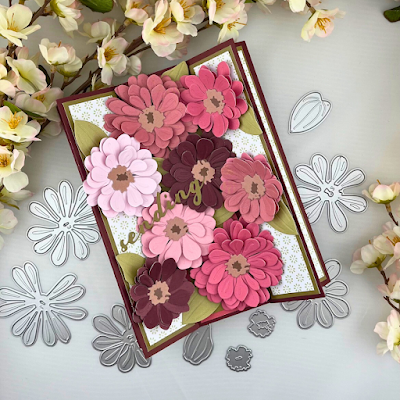
A dear friend of mine is adjusting to being on her own after months of having her son stay with her after her neck and back surgeries that started back in January. She's finally able to be on her own, but I know she's a little concerned about how things will go without her son's help. He lives in another state, so I think she's also just sad that he's so far away. I thought she'd enjoy a special card, so I chose a fun fold I've been playing around with recently. Have you heard of a wedge panel card? The inspiration for this card design comes from Di's Den for Stamping and Crafting on YouTube, and you find the tutorial here: #300 (25) Wedge Panel Card. Di made her card an A2 size, but I wanted a larger card to fit more flowers on, so I just turned mine into a 5 by 7 by altering the measurements slightly. I also left the center section flat rather than adding the pop-up Di used on her card. I wanted my flowers to curve around the wedge pieces. 

I started my card by trimming and scoring the base and then trimming and scoring all the wedge pieces. I added all the layers using Art Glitter liquid glue. 

Then I die cut Altenew's Craft-A-Flower: Zinnias flowers and leaves to create loads of pretty zinnias to embellish the front of the card. I also die cut the word "sending" using Altenew's Creative Cuts: Doves in Flight set. That set is great because it has several word dies and their shadows along with the pretty doves. I arranged all my flowers and leaves on the card front and adhered everything down using Altenew's Instant Dimension Foam Tape along with more liquid glue. Then I added the "sending" sentiment using liquid glue. 

For the inside of the card, I stamped one of the floral images from Altenew's Billowing Peonies set using my Stampwheel 2.0. That allowed me to turn the plate 180 degrees and stamp the image again on the top of the panel. I stamped it in green ink onto a light green panel for a tone-on-tone look. Then I stamped "hugs and lots of love" from the same Billowing Peonies set using pink ink. I added another pink zinnia to finish the inside. 

I've recently become an affiliate for Altenew, so if you are interested in ordering something lovely from Altenew and would like to use my link, thank you very much! Here's the link: Carrie's Altenew affiliate page 


Side View:


Inside the card:


Other angles:


Challenges I'm entering: 

 Creative Creases #104: ATG with a fun fold project (I'm on the DT so entering just for fun)

The Diva's that cut ....paper!: The Beginning of June 2025: Color challenge: 


Allsorts challenge blog: Seaside or ATG (4/5; ends 7/4/25)

Word Art Wednesday: ATG (4/5 for the week; 9/10 for the challenge; ends 7/2/25)

Beautiful Blossoms Challenge: ATG with flowers as the focus (4/6; ends 7/12/25)

As You Like It Challenge: Favorite Color Combo and Why: I love shades of red/pink and green because they are such a lovely combination that seems so elegant. (2/3; ends 7/10/25)


The Paper Shelter: ATG or Cut it Out (I die cut the the flowers and leaves) (2/2; ends 7/2/25)

Dream Valley Challenge: ATG (1/3; ends 7/18/25)

Crafty Catz: ATG (1/5; ends 7/10/25)

Creative Fingers Challenge Blog: ATG (1/3; ends 7/10/25)


Thursday, June 26, 2025

Slatted Z-Fold Birthday Card for Your Paper Insider

I was recently approached on Instagram by Your Paper Insider asking if I'd like one of their free mystery paper boxes in exchange for creating and sharing a card using the papers on social media. First, because Instagram is full of scams, I checked out their account, and I saw cards by crafters I admire and respect like Nicki Baxley on their Instagram account. Then I double checked with Nicki Baxley, and she highly recommended the company, so I happily accepted and received a box of beautiful papers within 3 days! 

This fun fold card features 4 of the papers from the 28 papers in the box. I've included a photo of the papers I used for the card at the end of my post if you'd like to check them out. I plan to do several other cards with the papers from the box. There were 28 papers included in the box, and they are a great variety of colors, thicknesses, types, etc. from vellum to heavy-duty cardstocks like the one I used for the card base here. If you're interested in ordering a box from Your Paper Insider to try out their papers, here's the link to their website: Your Paper Insider. My papers were from Box 11. 

To create the fun fold card, I followed a tutorial by Iced Images here: ðŸ”´ 5" x 7" Slatted Z-Fold Card | Livestream. She didn't add layers to her slats, so I just measured the areas I wanted to add the woodgrain paper to and took off 1/4 inch to make those layers. 

I used Altenew's Painted Geranium Stencil Art set and coordinating die for the floral image. I ink blended Altenew's Mahogany Bark, Mauve, Fresh Leaf, and Reindeer Moss Fresh Dye Inks through the stencils to create this tall and elegant floral focal point. 

The "happy birthday" and "wishing you a beautiful day" sentiments are from Altenew's Build-A-Garden: Nature's Magic set. I stamped them with brown ink onto scraps of the leftover mauve cardstock and added them to the front of the card with Altenew's Instant Dimension Foam Tape. 

To finish the card, I added 3 enamel dots from Altenew's Whispering Woodland Enamel Dots set. 

I've recently become an affiliate for Altenew, so if you are interested in ordering something lovely from Altenew and would like to use my link, thank you very much! Here's the link: Carrie's Altenew affiliate page 


Side view:


Here's a close up of the papers. I really love the woodgrain 
one and the floral embossed vellum especially:


Flat lay photos:


A look at the papers I chose to match my Painted Geranium 
stenciled and die cut image:


 Challenges I'm entering: 

Creative Creases #104: ATG with a fun fold project (I'm on the DT so entering just for fun)

Allsorts challenge blog: Seaside or ATG (3/5; ends 7/4/25)

Word Art Wednesday: ATG (3/5 for the week; 3/10 for the challenge; ends 7/2/25)

Beautiful Blossoms Challenge: ATG with flowers as the focus (3/6; ends 7/12/25)

As You Like It Challenge: Favorite Color Combo and Why: I love pink and green because they are such a lovely combination that reminds me of spring. (1/3; ends 7/10/25)


The Paper Shelter: ATG or Cut it Out (I die cut the geraniums) (1/2; ends 7/2/25)

Addicted to Stamps and More!: Die cuts and stencils (1/3; ends 7/1/25) C10

Crazy is our fame - STENCILS are our game!: ATG with stencils with option of Summer Fun (3/3; ends 6/28/25)

No more challenges. 

Monday, June 23, 2025

So Mushroom In My Heart Chair Step Card

 I love fun folds, and I recently saw one I hadn't done before. It's called a Chair Step Card, and you'll see in my photos how it got its name. I followed a tutorial from Di's Den for Stamping and Crafting here: #312 (25) Chair Step Card

Since I recently purchased Altenew's Mushroom Cottages Layering Die Set and their Mushroom Greetings Stamp Set, I thought I would combine them to create a card using the monthly challenge colors for the Inspiration Challenge on the Altenew blog. I chose some green cardstock for the base layer, some orange watercolor paper I had watercolored using Altenew's 36 Watercolor Pan Set (I used Sunkissed from the set) for the middle layer, and Kraft cardstock for the top layer. After I trimmed and scored all the pieces, I embossed the Kraft cardstock pieces with Altenew's Garden Harmony 3D embossing folder. 

I die cut and assembled my mushroom houses and foliage and arranged them on my card before stamping the sentiments and the stamped mushrooms for the back of the card. I colored the stamped mushrooms with my Ohuhu alcohol ink markers. After adhering everything with a mixture of Art Glitter glue and Altenew's Instant Dimension Foam Tape, I splattered the card with copper watercolor from Altenew's Metallic Watercolor 14 Pan Set. 

I've recently become an affiliate for Altenew, so if you are interested in ordering something lovely from Altenew and would like to use my link, thank you very much! Here's the link: Carrie's Altenew affiliate page 


Side view:


Here's a look at the back of the card:


Challenges I'm entering:

June 2025 Inspiration Challenge | Hope and Inspiration Card 


Creative Creases #104: ATG with a fun fold project (I'm on the DT so just entering for fun)

Allsorts challenge blog: Seaside or ATG (2/5; ends 7/4/25)

Word Art Wednesday: ATG (2/5 for the week; 2/10 for the challenge; ends 7/2/25)

A Place To Start: ATG with option of recycle it (8/8; ends at the end of the month)

613 Avenue Create: ATG with option of for the guys (8/8; ends at the end of the month)

Ellibelle's Corner: Ellibelle's Garden Party No. 4 - Anything In or From a Garden: ATG with something found in a garden (5/5; ends 7/9/25)

Ellibelle's Corner: Ellibelle's Crafty Wednesday: ATG (6/6; ends at the end of July)

Crafty Catz: ATG with option: Use hot colors (5/5; ends 6/27/25)

Creative Fingers Challenge Blog: ATG (3/3; ends 6/27/25)

As You Like It Challenge: To add a sentiment or not and why: I love to add sentiments to my cards because they add another level of personalization and often have an encouraging/uplifting message. Sometimes I only put them on the inside of the card though as in this case because the flowers were too pretty to cover up (3/3; ends 6/26/25)

C.R.A.F.T. Challenge: Cute/ATG (1/2; ends 6/25/25)

Can You Handle The Pressure?: ATG with an embossing folder with optional twist of add a butterfly (2/3; ends 6/25/25)

Homework for AECP class: Color Your Day: Lesson 1: create a card inspired by color (I chose the Inspiration Challenge Color Palette)