Tuesday, January 23, 2024

Peony Dream Sympathy Card

Sadly, it seems like I have been making a lot of sympathy cards lately. If you have visited my blog much, you know I regularly make and send cards to a group of shut ins at my church, and the husband in one of the couples I send cards to passed away this morning. He was in his 90s and ready to go home to be with Jesus, but it's still going to be hard for his family, especially his wife Marge who took such excellent care of him. This card is for Marge, and I'm keeping her in my prayers. 

The card base is a blue A2 top fold card base. You can't tell from the photo, but it's a shimmery card stock. Layered on the card base is a piece of textured, fabric-like paper that I distressed the edges of. Then I added a black panel that I had splattered with watercolor paints. 

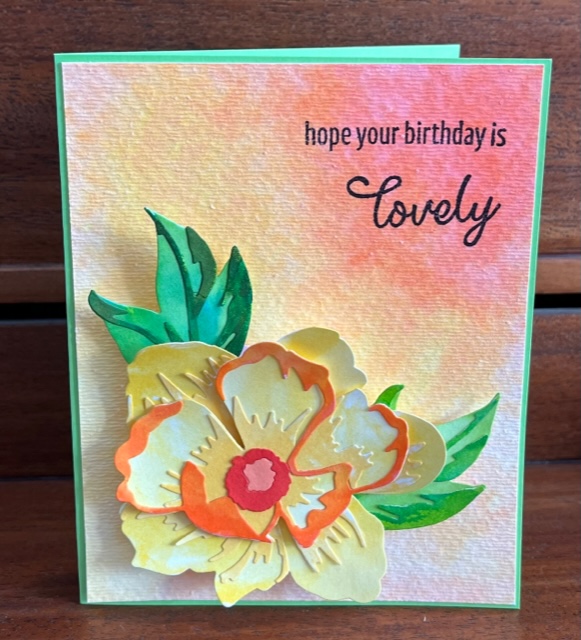
For the floral focal point, I used Altenew's Peony Dream die set and die cut the flowers and leaves out of white card stock. Then I used Altenew's watercolor brush markers to color the flower and leaf layers. I adhered the layers together with Art Glitter liquid glue and popped up the front flower using foam tape. The sentiment is from Altenew's Craft-Your-Life Bewitching Rose kit. I adhered the sentiment using foam tape, also. 


Challenges I'm entering:  


As You Like It Challenge: Favorite Paper Brand and Why? I like to use Neenah Bright white card stock (110 pound) because I can buy it in bulk from Sam's Club for a very reasonable price, and it cuts like a dream on my Silhouette Cameo and with metal dies. Also, I can ink blend onto it to get whatever colors I'd like, or even watercolor on it like I've done here. (2/3; ends 1/24/24)


Creative Knockouts: Lots of Layers (1/3; ends 1/31/24) C10

Crafty Catz (craftycatzweeklychallenge.blogspot.com): ATG with twist of no designer paper (1/5; ends 1/25/24) Top 3 Pick 1/25/24

Monday, January 22, 2024

Watercolor Peony Birthday Card

One of my sons bought me the entire collection of  Altenew's watercolor brush markers for Christmas (wasn't that a wonderful gift?!), and I finally broke them out to play with them this weekend! Like everything else I've used by Altenew, they did NOT disappoint! 

My mother-in-law is turning 80 at the end of the month, so I wanted to create a special card for her. She loves flowers of all kinds and has a very green thumb. I'm hoping she will enjoy this floral-themed card when we have her birthday dinner at our house next weekend.

Before starting this card, I searched "watercolor" on Altenew's blog, and one of the posts that came up included a tutorial on using salt to add texture to watercolor backgrounds. If you'd like to read the original post with the instructions, here's the link: Dramatic Watercolor Background with Salt feat. Calla Lilies (altenew.com). I had never tried the salt technique before, but it looked fun, so I chose a couple watercolor brushes and set about brushing some color onto a watercolor panel die cut for an A2 card. Then I sprinkled a liberal amount of salt on the panel and let it dry. The results weren't as dramatic as I had thought they would be, but when I tried the same technique using a deep blue distress ink, I found the salt added a lot more texture. Maybe the texture just shows up better with dark colors, but I still liked the way my background turned out for this card. 

The flower and leaves were die cut using Altenew's Peony Dream die set. I also used my watercolor markers to color the layers for the flower and leaves, and then I adhered the layers together with Art Glitter glue and used foam tape to pop up the flower on the background panel. I attached the background panel to a green A2 card base. Then I stamped the "hope your birthday is lovely" sentiment using a stamp from Altenew's Craft-Your-Life: Casual Bouquets kit. It was risky to stamp the sentiment after adhering the flower, but I used my Sizzix Stencil and Stamp platform, and the sticky mat works great for keeping my paper in place to stamp multiple times. I forgot to condition the stamp before stamping it, so I did need to stamp it 3 times before getting a good impression on all the words. 


A look at the panel while it was still wet. You can see how it faded into much softer colors once it dried:


Challenges I'm entering:  

Inspiration Challenge January 2024 | Start the Year Right! (altenew.com): Inspiration photo: The flowers in the front part of the photo are yellow with green leaves, so I hope my flowers match that well enough.


Word Art Wednesday: ATG (4/5 for the week; 4/10 for the challenge; ends 1/31/23) 


613 Avenue Create (avenue613.blogspot.com): ATG or New Beginnings (The peony die set is new, and the watercolor brush markers are also new) (5/8; ends at the end of the month) 

simonsaysstampblog.com/wednesdaychallenge/: Let's have some fun! (4/5; ends 1/24/24)

The Paper Funday Challenges: Let's Celebrate (2/4; ends at the end of the month)


A Place To Start (hereisaplacetostart.blogspot.com): Gatefold or ATG (ends at the end of the month) Rising Star Pick January 22-31, 2024

Beautiful Blossoms Challenge: Birthday (unlimited entries for this special challenge)

Friday, January 19, 2024

Camellia Japonica Step Card

Today I'm back on the Creative Creases Challenge blog as a GD sharing a new-to-me card design. If you'd like to join the fun over at Creative Creases where it's always anything goes with a fun-fold project, here's the link: https://secretstamper.com/2024/01/anything-goes-with-a-fun-fold-for-creative-creases-74/. Hope to see you over there!

One of my nieces got engaged earlier this month, and I was so excited to make a special card for her! I recently took a class at Altenew Academy titled All About Layering 5: Build A Flower Edition, and one of the card designs in that class was this step card with two panels of varying heights that add some dimension to the card. This is a free class, and here's the link if you'd like to learn how to create this card and several others: All About Layering 5 - BAF Edition Online Cardmaking Class – Altenew

I followed the instructions from the class to create the card base out of white card stock. Then I sprayed the layers with Mister Huey's Pretty Pink color mist. While that was drying, I stamped several of the flowers and leaves from Altenew's Build-A-Flower: Camellia Japonica set using pinks and reds for the flower and greens for the leaves. I die cut them using the coordinating dies. Then I assembled the card layers and added the flowers and leaves. I had some extra leaves I had stamped from Altenew's Stargazer Lily stamp set, so I added those to the middle layer for a little variation. The leaves were all adhered using Art Glitter glue while the flowers are popped up on foam tape. 

Then I die cut 3 "congrats" sentiments using a Hero Arts die and white card stock I covered with gold tape. I love that hack for creating inexpensive gold card stock! (Here's a link to the gold tape I used: Easy 99 Metallic Tape Mirror Tape Duct Tape DIY Decorative Tapes, 2.4 Inches x 55 Yards (Gold): Amazon.com: Industrial & Scientific. It also comes in silver if you want to make silver die cuts.) I added the "congrats" sentiments to the flowers and then had fun adding sequins to decorate the card front. 

For the back of the card, I used the same Hero Arts Congrats & Happy stamp and cut set to stamp "congratulations on your engagement" and then adhered another flower and 2 leaves to a green cardstock panel. I adhered that panel to the back of the card base to cover where the 2 front step panels had been adhered to the back. 


Close up of the flowers:


View of the back of the card:


Side view of the card to show the dimension from the two "steps": 


Challenges I'm entering:
 613 Avenue Create (avenue613.blogspot.com): ATG with option of new beginnings (this is a new stamp set and a new card design for me) (2/8; ends at the end of the month)

simonsaysstampblog.com/mondaychallenge/: Sparkle and Shine (3/5; ends 1/22/24)

Stamping Sensations: Moodboard or ATG: (I think these flowers look a lot like carnations, and I used some red tones in the card to match the moodboard) 

(1/3; ends at the end of the month)

We Love Stamping: Something new or ATG (I used a new stamp and die set and a new card design) (1/3; ends at the end of the month)

Beautiful Blossoms Challenge: ATG with florals as the focus and Birthday Celebrations (2nd challenge link on the same website): (6/6 for first challenge and unlimited entries for 2nd challenge; ends 2/12/24)

Word Art Wednesday: ATG (2/5 for the week; 2/10 for the challenge; ends 1/31/24)

Christmas BINGO Challenges: Letter G: Red, die cuts, and fancy fold (ends 2/16/24)

The Diva's that cut ....paper! (die-cut-divas.blogspot.com): Never Before Used Stuff (This is the first time I used the Camellia Japonica Build-A-Flower set) (4/4; ends at the end of the month)

simonsaysstampblog.com/wednesdaychallenge/: Let's have some fun! (3/5; ends 1/24/24)

The Paper Funday Challenges: Let's Celebrate (1/4; ends at the end of the month)

Thursday, January 18, 2024

Floral Acanthus Sympathy Card

One of our good family friends lost her brother to cancer last Sunday, and I wanted to make a special sympathy card for her. I started by ink blending several layers of Stormy Skies distress ink onto a white cardstock panel. I then added some white shimmery watercolor splatters and let the panel dry. Then I used a new-to-me Altenew embossing folder called Floral Acanthus that I got for Christmas to emboss the ink-blended panel. I trimmed the panel down to fit a black A2 card base and then adhered it to the card base using foam tape. I stamped "Heartfelt sympathy" from Altenew's Bewitching Rose stamp set and fussy cut it before adhering it to the bottom right of the card. 

For the inside of the card, I knew just the stamp I wanted to use. Our friend is studying the gospel of John in Bible Study Fellowship this year (as am I), and this week's passage happened to be John 11 where Jesus declares Himself the resurrection and the life and promises that anyone who believes in Him will live even though they die. God is such a caring, personal God to have that chapter be this week's lesson. Our friend mentioned what a comfort that was to study that passage right now. God's timing is perfect! I happen to have a stamp of that verse, so I stamped the verse on white card stock and fussy cut it. 

I adhered the verse to more of another section of the blue ink blended panel I trimmed to fit in a black rectangle to coordinate with the front of the card. I wrote a separate note to my friend so that she can pass this sympathy card along to someone else if she'd like. I often leave my cards unsigned so they can be recycled and sent to another person to lift their spirits. 


 Challenges I'm entering: 

Inspiration Challenge January 2024 | Start the Year Right! (altenew.com): Inspiration photo: I hope it's okay that I focused on the blue of the sky and the black and white of the lighthouse rather than including green and brown in my project. 


Word Art Wednesday: ATG (3/5 for the week; 3/10 for the challenge; ends 1/31/23) 


613 Avenue Create (avenue613.blogspot.com): ATG or New Beginnings (The embossing folder is new) (4/8; ends at the end of the month)

Can You Handle The Pressure? (cyhtp.blogspot.com): ATG with an optional twist of snow people (2/3; ends 1/24/24)

Wednesday, January 17, 2024

Feel Better Soon Epiphyllum Card

For Christmas this year, I ordered myself a lot of lovely new sets from Altenew when they were having their holiday specials (years ago my husband and I started choosing our own Christmas gifts from each other so we could get exactly what we wanted for our hobbies, so I always choose some crafty goodies). One of the sets I purchased is this Craft-A-Flower: Epiphyllum Layering Die Set. It's so easy to layer these dies since the base layers all have a keyhole that cuts out of them that makes it clear where to stack the layers. To create the blue flower layers, I ink blended Stormy Sky distress ink onto 2 white cardstock panels and sprayed the panels with water. Then I also splattered some white glimmer watercolor paint onto the darker of the two panels. I used these panels to die cut the layers for the flowers. 

The "feel better soon" sentiment comes from another new-to-me Altenew set called Grand Carnations. I love that there's a coordinating die for several of the sentiments in the stamp set including this feel better sentiment. 

I used a black A2 card base and layered a black-and-white panel as a background for the flower and sentiment. I added the leaves with Art Glitter glue and then adhered the flower with foam tape. I also added foam tape to the sentiment to adhere it to the card. 

For the inside of the card, I stamped "sending healing hugs" (also from the Grand Carnations set) onto a black-and-white panel I adhered to the card base. 


Challenges I'm entering: 


Beautiful Blossoms Challenge: ATG with flowers as the focus (5/6; ends 2/15/23)

Word Art Wednesday: ATG (1/5 for the week; 1/10 for the challenge; ends 1/31/23) 


613 Avenue Create (avenue613.blogspot.com): ATG or New Beginnings (The stamp and floral die sets are new) (3/8; ends at the end of the month)

simonsaysstampblog.com/wednesdaychallenge/: Let's have some fun (1/5; ends 1/24/24)

Tuesday, January 16, 2024

Praying for You Bellflower Card

I'm in love with Altenew's Craft-A-Flower sets! I purchased a few of them for Christmas when they were half off (my husband and I pick out our own birthday and Christmas gifts every year, so I always get what I want 😁), and these sets are so easy to assemble with the keyhole and arrow cut outs on the flower pieces. Just line them up using those cut outs, and the flowers turn out perfectly every time! 

For the base of this A2 card, I used kraft card stock. Then I used a stencil from Altenew's Build-A-Garden: Grand Carnation set and blended black ink over the stencil to create a background panel for my flowers. 

For the flowers, I die cut them out of a few shades of blue and then used my Ohuhu alcohol ink markers on a few of the petals because I liked the look that created. I adhered the die cut stem and leaves with Art Glitter glue and then added the flowers and the sentiment (the "praying for you" stamp is from Altenew's Craft Your Life Project Kit: Casual Bouquets) using foam tape for dimension.


 Challenges I'm entering: 


Beautiful Blossoms Challenge: ATG with flowers as the focus (4/6; ends 2/15/23)

Word Art Wednesday: ATG (4/5 for the week; 4/10 for the challenge; ends 1/17/23)

Crazy is our fame - STENCILS are our game! (stencilfun.blogspot.com): ATG with a stencil (optional twist of birds) (1/3; ends 2/3/23)

A Place To Start (hereisaplacetostart.blogspot.com): Gatefold card or ATG (ends at the end of the month)


A Perfect Time To Craft Open Challenge: ATG (ends at the end of the month) Spotlight Winner 2/29/24

The Diva's that cut ....paper! (die-cut-divas.blogspot.com): Never Before Used Stuff (the stencil, sentiment stamp, and blending brush are all new) (3/4; ends at the end of the month

 613 Avenue Create (avenue613.blogspot.com): ATG with option of new beginnings (this is a new stencil and a new sentiment stamp, and I used a new blending brush, too!) (3/8; ends at the end of the month)


Monday, January 15, 2024

Epiphyllum Feel Better Card

This is my second card using the Epiphyllum Craft-a-Flower set by Altenew, and this time, I used a 6X6 card base I created out of green cardstock. I layered a white panel with a black frame and then added a panel of sand-colored cardstock I embossed using Altenew's Bewitching Rose embossing folder. I was following the inspiration challenge photo on Altenew's challenge blog, so I chose my color scheme according to the challenge prompt. 

For the flower, I used panels I had ink blended with Stormy Skies distress ink and sprayed with water and splattered with white glimmer watercolor paint to die cut the flower petals. Then I die cut the flower center out of white card stock and then colored it with my Ohuhu alcohol ink markers. For the leaves, I die cut the packaging from an Altenew embossing folder. I liked the color and shininess of the cardstock they used and didn't want it to go to waste. I adhered the leaves to the embossed panel using Art Glitter glue and then popped up the flower using foam tape. 

The "feel better soon" sentiment is from the Build-A-Garden: Grand Carnations set and has a coordinating die I used to cut it out. I adhered it to the card with foam tape.


Close up of the flower:


This is the packaging I used to die cut the leaves:


I die cut several leaves as well as the "bloom" sentiment from Altenew's Craft-A-Flower: Bellflower layering die set:


Challenges I'm entering: 


Beautiful Blossoms Challenge: ATG with flowers as the focus (3/6; ends 2/15/23)

Word Art Wednesday: ATG (3/5 for the week; 3/10 for the challenge; ends 1/17/23)

Can You Handle The Pressure? (cyhtp.blogspot.com): ATG with an embossing folder (optional twist of snow) (1/3; ends 1/24/23)


simonsaysstampblog.com/mondaychallenge/: Sparkle and Shine (my leaves are die cut from a shiny card stock, and I splattered white shimmer watercolor paint on my flower petals) (1/5; ends 1/22/24)

Bellflower Birthday Card in Landscape Orientation

I had the pleasure of making 2 special birthday cards this weekend: one for my daughter (see the post for that one here: https://carriescustomcards.blogspot.com/2024/01/bellflower-birthday-card-in-portrait.html) and one for a friend of the family who shares a birthday with my daughter. I always make our friend a pecan pie for her birthday since it's her favorite dessert, and of course I have to make a special card to give her with the pie each year! 

I have once again set a goal of using items from my stash in the new year, so I chose a card base that I've had for YEARS. Since it has purples and reds, I die cut various shades of purple and red card stock to create the petals from the Craft-A-Flower: Bellflower set by Altenew that I received for Christmas. It's so fun to work with this set! The flowers come together easily with the keyhole and arrow cut outs on the pieces that enable me to assemble them easily. I also die cut the "bloom" sentiment from that set twice using the packaging from an Altenew embossing folder. I glued the two dies together to give it some dimension. 

I used Art Glitter glue to adhere the leaves, stem, and bloom sentiment to the card front. Then I used foam tape to pop up the flowers before adding some sequins to give the card a little sparkle. 

For the inside of the card, I used two stamps from Altenew's Craft Your Life Project Kit: Bewitching Rose: "sending you" and "birthday wishes."


Packaging I used for the word "bloom":


Challenges I'm entering: 

Birthstone Challenges: Garnet and Amethyst (ends 2/15/24)

Beautiful Blossoms ChallengeBeautiful Blossoms Challenge: ATG with florals as the focus and Birthday Celebrations (2nd challenge link on the same website): (2/6 for first challenge and unlimited entries for 2nd challenge; ends 2/12/24)

simonsaysstampblog.com/mondaychallenge/: Sparkle and Shine (1/5; ends 1/22/24)

Word Art Wednesday: ATG (2/10; ends 1/17/24)


The Diva's that cut ....paper! (die-cut-divas.blogspot.com): Never Before Used Stuff (This is the first time I've used the "bloom" die) (2/4; ends at the end of the month)

Bellflower Birthday Card in Portrait Orientation

For my daughter's birthday, I wanted to create a special card, and I decided to use the Craft-A-Flower: Bellflower set I got for Christmas for the focal point. I chose an A2 card base I had in my stash and then selected some card stock in purples and reds to die cut the flower petals. This set is easy to assemble since there are arrows and keyholes cut into the flower petals to make layering the petals a breeze. I also love that the small pieces can be die cut using my paper scraps! I have so many of them and am always looking for ways to use them. 

I adhered the leaves and stem to the card using Art Glitter glue and then popped up the flowers using foam tape. I stamped the "birthday wishes" onto the card base using my Sizzix Stamp and Stencil platform. The sentiment is from Altenew's Craft Your Life Project Kit: Bewitching Rose. I added a few sequins for a little sparkle. 


Close ups of the flowers:


 Challenges I'm entering: 


Crafty Calendar Challenge: ATG (1/3; ends 1/28/24)


Birthstone Challenges: Garnet and Amethyst (ends 2/15/24)


simonsaysstampblog.com/mondaychallenge/: Sparkle and Shine (2/5; ends 1/22/24)

Snippets Playground: Challenge #471 - Celebration Theme (pixiessnippetsplayground.blogspot.com): Celebrations + use snippets (I used snippets of purple, red, yellow, orange, and green cardstock for the flowers, leaves, and stem. All die cuts were made using snippets and yet I haven't made a dent in my snippet collection! Thanks for a challenge that helps remind me to use them!) (1/1; ends 1/20/24) C10

Beautiful Blossoms Challenge: ATG with florals as the focus and Birthday Celebrations (2nd challenge link on the same website): (1/6 for first challenge and unlimited entries for 2nd challenge; ends 2/12/24)

Word Art Wednesday: ATG (1/10; ends 1/17/24)


No more challenges.

Sunday, January 14, 2024

Shaped Valentine Cards

I recently purchased this adorable hedgehog/mushroom digi stamp from Polkadoodles with the idea of using it to create Valentine cards.  I used my Silhouette Design Studio software to create an offset of the digi after sizing it up to a size that would work for an A2 envelope. After creating the offset, I copied the offset twice and then welded the two copies together on the side.  I added a score line in the middle and had my card base made. Then I added some sentiments and designs to the inside and did a print and cut of the base. I did a print and cut of the mushroom/hedgehog/bird digi stamp and glued it to the front of the card base. Then I stamped the envelope with a Valentine-themed design (the sentiment and the heart on the left are from SU!'s Share A Milkshake bundle). Now that I've saved the design, I'll be able to print and cut a batch of these for my Bible Study Fellowship students to give them the week of Valentine's Day. 


The Diva's that cut ....paper! (die-cut-divas.blogspot.com): Never Before Used Stuff (this is a new digi I just bought to make Valentine cards with. I hope I understood the rules to mean I could use my Silhouette Cameo 4 and not just traditional metal dies) (1/4; ends at the end of the month) Monthly Winner 2/4/24


TIME OUT Challenges: New (This digi stamp is new. I just purchased it to make Valentine cards. I also created a new card design for this card.) (1/5; ends 1/17/24) C5


As You Like It Challenge: Favorite paper brand and why: I love to use Neenah Bright White cardstock because it cuts so well on my Cameo 4. I do a lot of print and cut designs, and it works beautifully for that. I can also use ink blending on it if I want to create backgrounds. (1/3; ends 1/24/24)


No more challenges.