Friday, June 21, 2024

Forked Pillar Card for Creative Creases #85

It's time for another fun challenge over at the Creative Creases Challenge blog where it's always anything goes with a fun fold project! I hope you can join in by sharing your fun fold creations here: Anything Goes with a Fun Fold for Creative Creases #85 (secretstamper.com)

The idea for this card came from this video: 5x7 Forked Pillar Card (youtube.com). If you like unique fun fold cards, Iced Images is a great YouTube channel to subscribe to. I've gotten loads of great card designs from watching Louise's videos.

Using the measurements and instructions from the video linked above, I made the card base and several of the layers. I used some gold glitter card stock for the smaller side panels and colored some white card stock with my Ohuhu alcohol ink markers to match the deep purple in the bottom flower of the floral focal point as the base layer underneath the gold glitter card stock. I decided that instead of using pattern paper for the larger front panels, I would stamp, stencil, and die cut Altenew's Craft-Your-Life: Always Sunshine floral focal point and then cut it up to put it on the front panels. I stamped the image with VersaMark ink and then embossed it using Altenew's Rose Gold embossing powder. Then I used the coordinating stencils to color the image following the colors in Altenew's monthly challenge. After die cutting it, I cut it into one-inch segments to fit on the front panels. The top segment was a little too tall, but rather than trim the very top off, I left it as is because I like how it goes off the card base a little. 

I stamped "consider this card a big hug" from the same Always Sunshine set and then added some gold sequins and orange and green gems to embellish the front. 

For the back panels, I made the layers using the measurements in the video and then embossed the white layers with the coordinating 3D embossing folder that comes in the Always Sunshine kit. I colored the embossed areas using the coordinating stencil and 2 shades of green. I wanted this to be a get well card for my uncle who is in the hospital right now, so I used the "feel better soon" sentiment from Altenew's Build-A-Garden: Grand Carnations set using VersaMark ink and Altenew's Rose Gold embossing powder again. Then I die cut the sentiment with the coordinating die from the Grand Carnations set. I just love it when there's a coordinating die for sentiments! I then used the Crafted with Love stamp set Altenew sent me for free this April to add a bit of personalization. To finish the card, I added a few diamond and orange gemstone butterflies. 


Side views:


Top views: 


Back of the card:


The card folds flat for mailing:


Challenges I'm entering: 

Easy Thank You Card for June 2024 Inspiration Challenge (altenew.com): (ends at the end of the month)


613 Avenue Create (avenue613.blogspot.com): ATG or option of For The Guys (ends at the end of the month)

Triple B (dd-tripleb.blogspot.com): Birds, blooms, and/or butterflies (2/3; ends at the end of the month)

Word Art Wednesday: ATG (1/5 for the week; 1/10 for the challenge; ends 7/2/24)


A Place To Start (hereisaplacetostart.blogspot.com): ATG (ends at the end of the month)

Beautiful Blossoms Challenge: ATG with flowers as the focus (1/6; ends 7/12/24)

simonsaysstampblog.com/wednesdaychallenge/: Emboss it (my card features heat embossing with Rose Gold embossing powder and dry embossing with Altenew's 3D Always Sunshine embossing folder. (1/5; ends 6/26/24)

Crafty Gals Corner (craftygalscornerchallenges.blogspot.com): Fun folds (2/3; ends at the end of the month)


Sunday, June 16, 2024

Swinging Gate Father's Day Card

My husband is an amazing father to our grown children and a wonderful, fun grandpa to our soon-to-be 2-year-old grandson. I always try to make him a special Father's Day card, and this year I had a new Altenew Craft-Your-Life: Rustic Charm set to play with to create his card.

For the background, I added VersaMark embossing ink through the cloud stencil that came with the Rustic Charm set. Then I added white embossing powder and heat set the clouds. They have some nice texture to them that you can't really see in the photos. I stamped "Happy Father's Day" with a retired CTMH stamp and then set to work on creating the gate. I wanted it to swing open and shut, so I die cut the gate in white cardstock with a half inch "hinge" (I scored the paper with a half inch on the left side that I folded over and when I die cut the gate, I made sure the part with the folded over scored portion didn't go to the edge of the die so that it left a hinge on that part that I could adhere to the back of the card. Then I die cut a gate using woodgrain card stock and embossed it using the coordinating embossing folder and adhered it to the white gate with foam tape. I also die cut a third gate out of the same woodgrain paper but the backside of the paper so that when I flipped the gate die cut, it would fit on the inside of the white gate and cover the white gate. 

The birds and branches were made from the same Rustic Charm set, and I added one on the inside of the card so it shows more fully when the gate is open. The second was added directly to the front of the gate. 

I added the "Every birdy thinks you're great" sentiment (which was a print and cut I designed in Silhouette Design Studio software) with foam tape, and the card was finished. 


Close up:


When the gate is open:


Close up:


 Challenges I'm entering: 


Allsorts challenge blog: Masculine (3/3; ends 6/22/24)

Crafty Catz (craftycatzweeklychallenge.blogspot.com): ATG with option of Make it Masculine (3/5; ends 6/27/24)

Creative Fingers Challenge Blog: ATG (3/3; ends 6/29/24)

As You Like It Challenge: With or Without Words and Why: I prefer to add a sentiment to my cards (whether on the inside or the card front) because I like to personalize the card that way and give a message to fit the occasion. (3/3; ends 6/26/24)

simonsaysstampblog.com/wednesdaychallenge/: Bright and Cheerful (3/5; ends 6/19/24)

Word Art Wednesday: ATG (3/5 for the week; 8/10 for the challenge; ends 6/19/24)

Cardz 4 Guyz: Father's Day (3/3; ends 6/24/24)


A Place To Start (hereisaplacetostart.blogspot.com): ATG (ends at the end of the month)

Double Trouble Paper Crafting (doubletroublechallenge.blogspot.com): Thing 1: Masculine project (ends 6/16/24) (3/4; ends 6/16/24)

Inspiration Station (inspirationstationchallenge.blogspot.com): The photo shows a celebration, and my card is celebrating 2 dads: my FIL and my son (4/8; ends at the end of the  month 


613 Avenue Create (avenue613.blogspot.com): ATG or option of For The Guys (ends at the end of the month)

Triple B (dd-tripleb.blogspot.com): Birds, blooms, and/or butterflies (1/3; ends at the end of the month)

Every Birdy Father's Day Card

I'm very blessed to have a loving Christian father who trained me up to know the Lord from a young age and prayed with me and for me tirelessly throughout my life. He's incredibly generous and has always been supportive and encouraging. For Father's Day, I made him a special card using a set I just received last week: Altenew's Craft-Your-Life: Rustic Charm. It comes with two bird stamps, 2 branch stamps (the birds and branches are mirror images so that you can use the same stencils for both of them by simply using either the front or back of the stencil depending on the orientation of the stamped image), a large floral focal point (which I didn't use here), and many sentiments. There's also a fence die, stencils for the fence, and an embossing folder to emboss the die cut fence. 

For this card, I first die cut the fence die using a woodgrain pattern paper and then ran that through with the coordinating 3D embossing folder. I really like how that turned out! Then I set about creating the birds and branches. I die cut multiples of them and used a jig in my MISTI to hold the die cut pieces in place while I stamped them all. Then I used the stencils to color them. 

For the "Happy Father's Day" sentiment, I used a retired CTMH stamp. For the "Every birdy thinks you're great" sentiment, I used my Silhouette Design Studio software to create a print and cut and then used my Cameo 4 to cut it out. 

I added the fence to the blue A2 card base and then arranged the birds and branches and added the branches with Art Glitter glue and the birds with foam tape. 

For the inside of the card, I added a yellow panel and then added the "Every birdy thinks you're great" sentiment with Art Glitter glue and finished the inside by adding another of the birds I had stamped and stenciled. 

I know Father's Day can be challenging for some people as their earthly fathers have disappointed them or maybe even abandoned them, and I'd just like to add that our Heavenly Father loves us with a perfect love and has promised never to leave us or forsake us. May you find comfort in the knowledge that you are cherished by the Father who created you and sent His Son to die on the cross as payment for your sins so you can be given the gift of eternal life through faith in Jesus.  


Close up of the birds:


Inside the card:


Close up:


Challenges I'm entering: 


We Love Stamping: Fabulous Florals or ATG (3/3; ends at the end of the month)

Stamping Sensations: Moodboard or ATG (3/3; ends at the end of the month)

Allsorts challenge blog: Masculine (2/3; ends 6/22/24)


Crafty Catz (craftycatzweeklychallenge.blogspot.com): ATG with option of Make it Masculine (2/5; ends 6/27/24)

Creative Fingers Challenge Blog: ATG (2/3; ends 6/29/24)

As You Like It Challenge: With or Without Words and Why: I prefer to add a sentiment to my cards (whether on the inside or the card front) because I like to personalize the card that way and give a message to fit the occasion. (2/3; ends 6/26/24)

simonsaysstampblog.com/wednesdaychallenge/: Bright and Cheerful (2/5; ends 6/19/24)

Word Art Wednesday: ATG (2/5 for the week; 7/10 for the challenge; ends 6/19/24)

Cardz 4 Guyz: Father's Day (2/3; ends 6/24/24)


A Place To Start (hereisaplacetostart.blogspot.com): ATG (ends at the end of the month)

Double Trouble Paper Crafting (doubletroublechallenge.blogspot.com): Thing 1: Masculine project (ends 6/16/24) (2/4; ends 6/16/24)

Inspiration Station (inspirationstationchallenge.blogspot.com): The photo shows a celebration, and my card is celebrating 2 dads: my FIL and my son (3/8; ends at the end of the  month 


613 Avenue Create (avenue613.blogspot.com): ATG or option of For The Guys (ends at the end of the month)

Triple B (dd-tripleb.blogspot.com): Birds, blooms, and/or butterflies (2/3; ends at the end of the month)

Saturday, June 15, 2024

Fishing You A Happy Father's Day Card

My son and father-in-law are avid fishermen, so I wanted to create Father's Day cards with a fishing theme for them. I chose this Accordion Double Gatefold card design and some fishing-themed pattern papers and got busy crafting these cards. I created a cut file in my Silhouette Design Studio software and cut out the card base and layers using my Silhouette Cameo 4. For all the measurements and instructions, see this video that I used to create my cut file: Fun Fold Friday: Accordion Double Gate Fold Fun Fold Card (youtube.com). I also created a print and cut of the "Fishing you a very happy Father's Day" sentiment using my Silhouette Design Studio software. 

After cutting the card bases and layers, I assembled the cards and then die cut the pieces for the wooden rowboats on the front of the cards using Altenew's Wooden Rowboat Die Set. For the first card, I also embossed a blue panel I had used ink smooshing and sprays on using Altenew's From Land to Sea 3D embossing folder. 

The first rowboat was die cut from pattern papers and colored card stocks, so I just adhered the pieces and then attached the boat to the front of the card with foam tape to give it some dimension. For the second rowboat, I die cut all the pieces from white cardstock and then colored them using my Ohuhu alcohol ink markers. 


Closed:


Partially open:


Fully open:


Closed:


Partially open:


Fully open:


Close up of the sentiment:


View from the top:


Close up of the embossed panel:


Challenges I'm entering: 

Tic Tac Toe Challenge - Inspiring creativity 8-ways each week : Layers, die cut, patterned paper (1/3; ends 6/20/24)


Allsorts challenge blog: Masculine (1/3; ends 6/22/24)


Crafty Catz (craftycatzweeklychallenge.blogspot.com): ATG with option of Make it Masculine (1/5; ends 6/27/24)

Creative Creases Challenge Archives - Secrets to Stamping (secretstamper.com): ATG with a fun fold (unlimited entries; ends 6/21/24)

Creative Fingers Challenge Blog: ATG (1/3; ends 6/29/24)

As You Like It Challenge: With or Without Words and Why: I prefer to add a sentiment to my cards (whether on the inside or the card front) because I like to personalize the card that way and give a message to fit the occasion. (1/3; ends 6/26/24) Top 3 Pick 6/27/24

Crafty Gals Corner (craftygalscornerchallenges.blogspot.com): ATG with twist of a fun fold (1/3; ends 7/7/24)

Double D Challenges (daranddiane.blogspot.com): Something old, new, borrowed or blue (pick 3) I used old fishing-themed papers from my stash along with a roll of brand new foam tape (to pop up the boat die), and added a water color panel I had colored blue with inks and sprays for behind the boat on the first card (I hope light blue/aqua works for the challenge). (2/3; ends 6/16/24)

The Paper Shelter: A Time to Celebrate (1/2; ends 6/19/24)

simonsaysstampblog.com/wednesdaychallenge/: Bright and Cheerful (1/5; ends 6/19/24)

The Paper Funday Challenges: Fancy Folds (3/4; ends at the end of the month)

Word Art Wednesday: ATG (1/5 for the week; 6/10 for the challenge; ends 6/19/24)

Cardz 4 Guyz: Father's Day (1/3; ends 6/24/24)


A Place To Start (hereisaplacetostart.blogspot.com): ATG (ends at the end of the month)


Inspiration Station (inspirationstationchallenge.blogspot.com): The photo shows a celebration, and my card is celebrating 2 dads: my FIL and my son (2/8; ends at the end of the  month 


613 Avenue Create (avenue613.blogspot.com): ATG or option of For The Guys (ends at the end of the month)

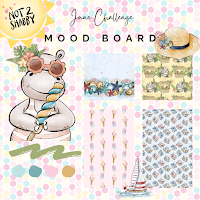
JUNE 2024 MOOD BOARD CARD CHALLENGE (not2shabbyshop.com): The sea theme on the moodboard goes with my fishing/boating card theme (1/4; ends at the end of the month) 


Monday, June 10, 2024

Live For the Moments Card

My oldest son and his wife are expecting a new baby this October, so my little 23-month-old grandson is going to be a big brother! We are thrilled beyond words!

I wanted to make a special card to celebrate the good news, so I pulled out my Altenew Craft-A-Flower: Stargazer Lily dies and die cut some paper I had used watercolors, ink smooshing, and sprays on. I die cut all the parts to create the 2 lilies in the set along with several leaves from the same set, and then I assembled the flowers and set them aside. 

I used the Tim Holtz Burlap stencil and some purple glitter paste to give the background panel some texture. Then I stamped the sentiment: Live for the moments you can't put into words (from Altenew's Craft-Your-Life: Bewitching Rose set) and adhered the leaves and lilies with liquid glue and some foam tape. I attached the panel to a green A2 card base. 

For the inside of the card, I used Hero Arts' Stamp & Cut: Congrats Happy set to die cut the "congrats" out of fun foam and stamp the "on your new baby." 


Close up of the flowers:


Inside the card:


Challenges I'm entering: 

New tab (timeoutchallenges.blogspot.com): My card features flowers as the theme, going along with the theme of the quote. (5/5; ends 6/19/24) C5


Crafty Catz (craftycatzweeklychallenge.blogspot.com): ATG with option of use a stencil (4/5; ends 6/13/24)

Crazy is our fame - STENCILS are our game! (stencilfun.blogspot.com): ATG with stencils (3/3; ends at the end of the month)

Word Art Wednesday: ATG (4/5 for the week; 4/10 for the challenge; ends 6/19/24)

 The Diva's that cut ....paper! (die-cut-divas.blogspot.com): Favorite die cut shape: I love flower die cuts best! Especially Altenew's flowers! (2/4; ends at the end of the month)

No more challenges. 

Sunday, June 9, 2024

Make Your Own Sunshine Card

A recent challenge in the FB Altenew Fan Group was to try a new stencil technique. When I saw that prompt, I knew I wanted to try out the technique I had seen Nicki Baxter (Nicki Hearts Cards) use in a YouTube video. Here's a link to her video: 3 MUST-SEE Embossing Powder Ideas with Masculine Card Making (youtube.com). For the last technique she shows in the video, she used embossing paste through a stencil and then added 3 different colors of WOW  embossing powder over the embossing paste. 

To follow Nikki's technique, I applied embossing paste through Altenew's Bursting Dahlia stencil and then added teal, pink, and yellow WOW embossing powders over the embossing paste. Then I used my heat gun on the powder to melt it. This type of embossing powder has bits of metallic and white in it, and when I heated it up, it bubbled up. That was fun to watch! I love the way it looked when I had finished heating it up! It is the most unusual embossing powder I've ever used, and using it with the embossing paste gave it extra dimension. It's very smooth and shiny in person. 

I wanted the embossed dahlia to the focus of the card, so I trimmed the panel I had made it on down to fit a 5X7 card and then matted it with blue card stock behind it. I created a pink 5X7 card base and then stamped the sentiment: "Some days you have to create your own sunshine" from Altenew's CYL: Floral Acanthus set with VersaMark ink and white embossing powder. I heat set the sentiment and then added it to the front panel. I considered adding some embellishments to the top of the card, but in the end I left it as is with the dahlia drawing all the focus. I think next time I try this I may do some background stamping (maybe tone-on-tone) so it's not a stark white panel, but for now, I'm excited to have tried a new technique and really like how this turned out. Thanks, Nicki!


A closer look at the sentiment:


Close ups of the embossed areas. Note the white and gold flecks that were part of the WOW embossing powder sets:


Here's what it looked like before I heat set the embossing powder:


Here's after I heat set it:


Challenges I'm entering: 

Allsorts challenge blog: Flowers Galore (3/3; ends 6/14/24)

New tab (timeoutchallenges.blogspot.com): My card features flowers as the theme. Hopefully you want to see them 😁 (4/5; ends 6/19/24) C5


Crafty Catz (craftycatzweeklychallenge.blogspot.com): ATG with option of use a stencil (3/5; ends 6/13/24)

Crazy is our fame - STENCILS are our game! (stencilfun.blogspot.com): ATG with stencils (2/3; ends at the end of the month)

Word Art Wednesday: ATG (3/5 for the week; 3/10 for the challenge; ends 6/19/24)

No more challenges. 


Saturday, June 8, 2024

Casual Bouquets No-Line Ink Blending

 I was recently challenged in the Altenew Fan Group on FaceBook to create a project using no-line ink blending. I wasn't even sure what that was, but when I googled it, a YouTube video tutorial showed up that uses Altenew's Craft-Your-Life: Casual Bouquets set and no-line ink-blending. It turns out you just take the coordinating stencils and create the images without using the stamps. I love how this turned out! It wasn't as hard as I feared it would be. 

I did the no-line ink blending on two of the florals from the set and then embossed them using the coordinating 3D embossing folder. Then I decided to use the florals to create a mini slimline card since I hadn't done one of those in awhile. I created a mini slimline card base out of pink card stock and then stamped the grid pattern from the back of Altenew's sticky mat onto some yellow card stock using pink ink. I adhered the yellow panel to the pink card base and then added the embossed flowers with foam tape after stamping the "Praying for you" sentiment (from the same Casual Bouquets set) onto the yellow panel. I added 3 clear embellishments to finish off the card. I think these spring colors are cheerful and will hopefully lift the spirits of my recipient. 


Close up of the flowers:


The first no-line ink blending was done on a large white panel:


The second one was done after I die cut the shape first (I preferred this method because I felt like it was easier to line the stencils up). I apologize for the shadows on the photos! My photography skills are a bit lacking!


The Altenew sticky mat works great to hold paper and stencils in place! 


Challenges I'm entering: 

Allsorts challenge blog: Flowers Galore (2/3; ends 6/14/24)

New tab (timeoutchallenges.blogspot.com): My card features flowers as the theme. Hopefully you want to see them 😁 (3/5; ends 6/19/24) C5


Crafty Catz (craftycatzweeklychallenge.blogspot.com): ATG with option of use a stencil (2/5; ends 6/13/24)


Word Art Wednesday: ATG (2/5 for the week; 2/10 for the challenge; ends 6/19/24)

No more challenges.